
With our heavy duty workbenches complete, I’ve moved on to building a pair of sawhorses for the shop. While our workbenches double quite well as supports for our mounted saws, sometimes I find it very convenient to just move a sawhorse or two in place to support infeed or outfeed, or to create a temporary work surface using plywood or dimensional lumber. (This is especially true when we’re working outside or around town, or other times when our workbenches aren’t available.)
After looking around online, I found exactly what I wanted for a design, albeit with build instructions that are a bit complicated.
I’m going to lay out the directions for you here, so you can build your own wooden sawhorses. While some of the cuts to make these are complex, I’ll make it as simple as possible to complete, with detailed settings for your mitre saw for each piece. If you’re looking for something easier to build than these models, Timothy from Charles and Hudson (C&H) provides a great alternative for simple (but still sturdy) sawhorses. C&H’s sawhorses stack, but do not fold, and the legs angle in only two dimensions rather than three.
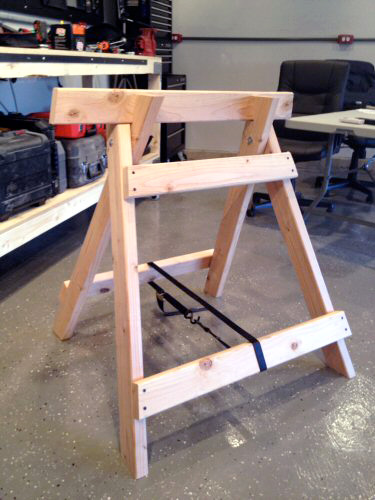
If you follow these directions, you’ll end up with one very strong sawhorse measuring 36-1/4″ tall x 32″ long x 33-3/4″ wide. The reason this sawhorse is so strong is that all the downward force is evenly distributed through the legs to the floor. With the legs angling in, this sawhorse is extremely stable, and very difficult to tip over.
Tools & Materials List
Here are the tools and materials you’ll need to complete this project. Total cost is less than $20, and a little less than half of that is for the 6′ locking tie down. The harness could be substituted for a less expensive model. With some thrift, this sawhorse could be built for under $15.
The Shopping List
- (3) 8 foot 2×4’s
- (2) 3/8″ x 3-1/2″ carriage bolts
- (6) 3/8″ washers
- (2) 3/8″ nuts
- (10) 2-1/2″ wood screws
- (1) 6 foot locking tie down harness
Tools
- Compound miter saw (must be capable of bevel and miter cuts)
- Jigsaw (or similar alternative, but not a circular saw)
- Drill/driver
- Impact driver (optional)
- Square
Steps to Make Wooden Sawhorses
Step 1: Cut the Lumber for Individual Components
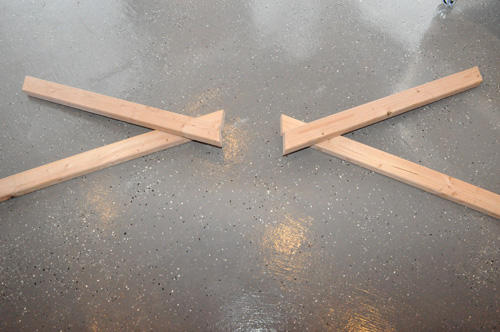
I’ve labeled each leg in the pictures below to help avoid confusion. Keep in mind that you’ll need to cut miter and bevel angles on the top and bottom of each piece while maintaining the appropriate length. All legs should measure 40″ long after these cuts, and each measurement listed assumes the work piece is on the right-hand side of the miter saw, same-side up. It makes sense that legs 1 & 3 and legs 2 & 4 are identical, because they are the same piece turned in the opposite direction.
- Leg 1 & 3 Top: 25° miter right, 10° bevel right
- Leg 1 & 3 Bottom: 25° miter right, 10° bevel left
- Leg 2 & 4 Top: 25° miter left, 10° bevel right
- Leg 2 & 4 Bottom: 25° miter left, 10° bevel left
- Lower Supports: 32″ & 29″ long with 10° miter cuts on both sides
- Upper Support: 24-1/2″ long with 10° miter cuts on both sides
- Cross Member: 36″ long, straight cut on both sides.


Once the legs are cut, you should end up with something like this.
Step 2: Cut the Notch
You want the cross member to be parallel to the ground, and that requires cutting notches on each leg. Again, these will be compound cuts, since the legs are angled inwards in two direction. You won’t be able to achieve both cuts with a miter saw. That’s where the jigsaw will come in handy.
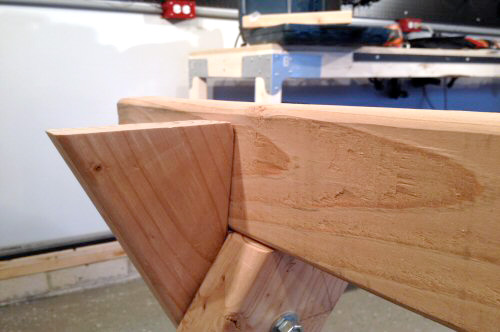
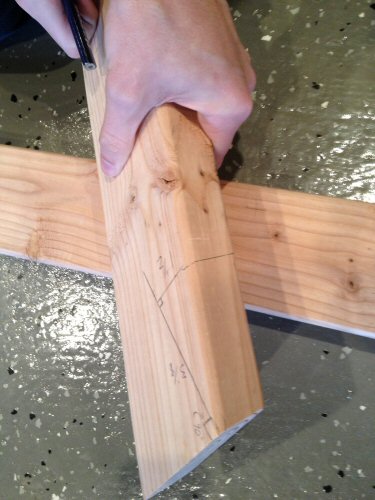
First, mark your cut on both sides of the leg. These lines should be on the “inside” edge where the leg comes in contact with the cross member. The first line should be perpendicular to the topside of the leg. Set your square in place on the top of the leg and draw a line starting at the top corner. This downward line should measure 3-1/8″. Note that in the first picture below, the slide on the square is touching the top of the board (the angle in the picture doesn’t show this well).
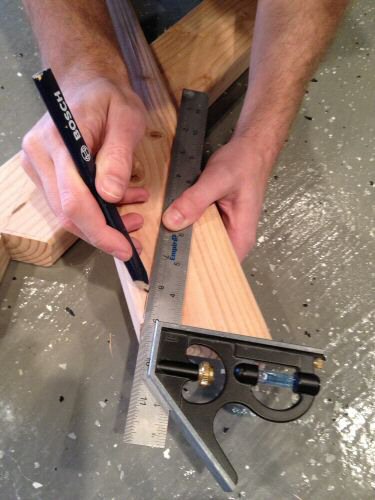
Your next line will form a right angle and continue all the way to the edge of the 2×4. If you’ve done everything correctly, it’ll measure 1-1/2″ long.
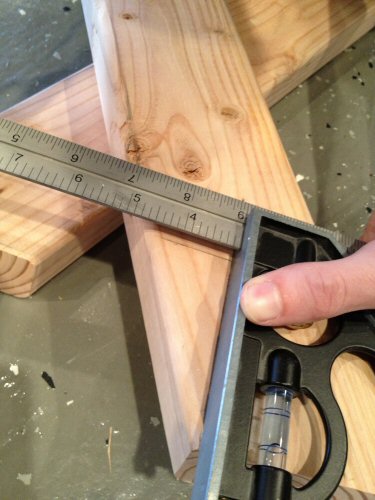
The result will look like this. Note the right angle indicators.
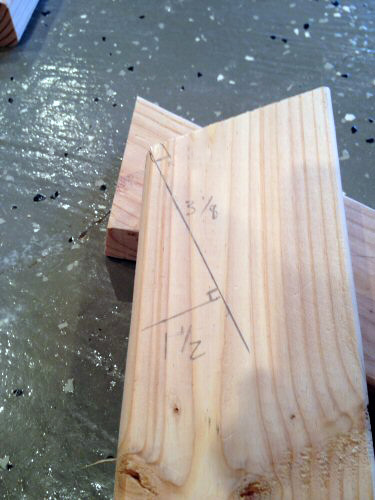
Flip the 2×4 and repeat the process.
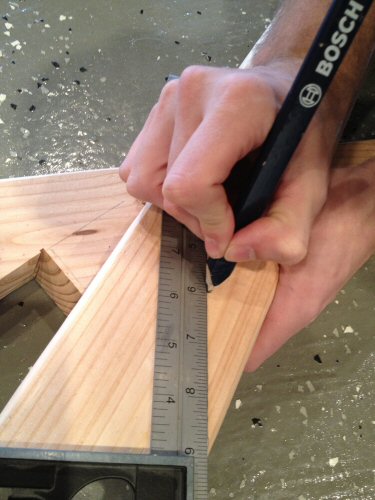
When you turn the 2×4 on end and draw a line between the two edges, it’ll have the same 10° angle as the top, because on each side of the 2×4 you measured from the top of that side of the board.
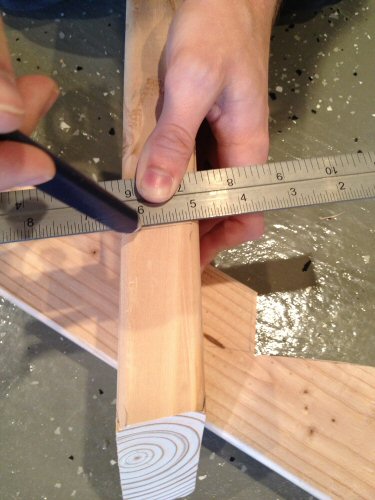
This pictures shows how the line continues around the side of the board.
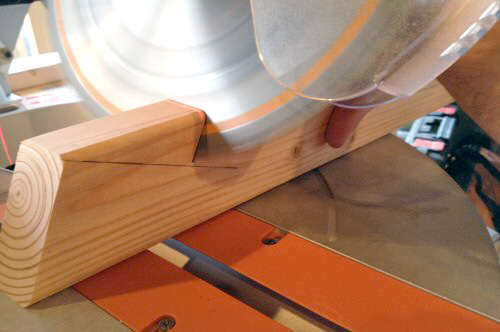
You can make the first cut with your miter saw set to a 25° bevel and 10° miter. Be careful with the depth of this cut, as the depth varies across the cut because of the 10° bevel.
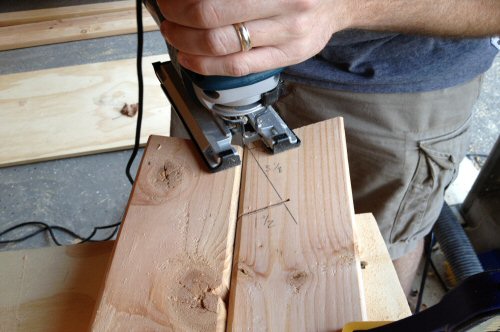
The second cut needs to be done with a jigsaw or handsaw. Be careful to keep the blade perfectly straight up and down, and use a piece of scrap wood to help level the jigsaw. Remember that the lines on the two sides (top and bottom) are offset (by 10°) so one side will be finished before the other side. We recommend placing the 2×4 with the shorter line on top. Towards the end of the cut, you will need to slightly angle the jigsaw backward, or you will cut too deeply at the top.
Notch all four legs on their inside edge using the same technique.
Step 3: Drill Bolt Holes
Next, you’ll drill a hole for the carriage bolt which will act as a hinge to collapse the sawhorse. Drill the hole 6″ down, centered on the 2×4. It’s best if you drill through both legs at the same time. Legs 2 & 3 are situated on the inside (1 & 4 on the outside), and you should drill the holes in the same orientation. In order to center the 2x4s at the right place, you’ll need to use a scrap 2×4 in the gap created by the notch. When the 2x4s are properly aligned, the notch should firmly hold the 2×4. Clamp the 2x4s in place before drilling.
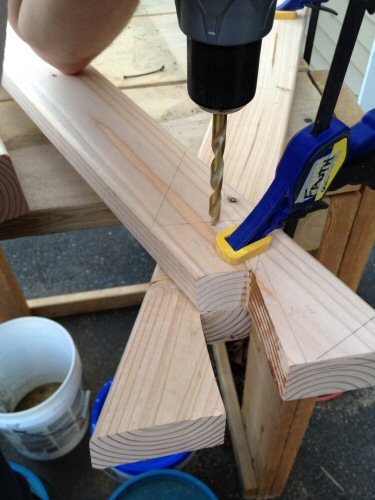
Step 4: Insert the Carriage Bolts and Washers
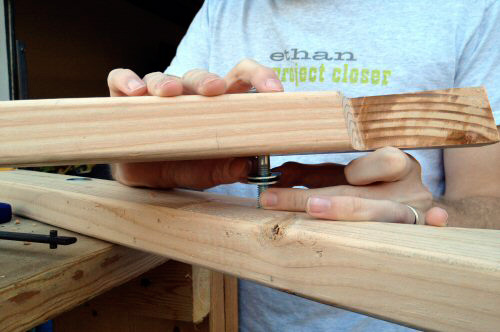
Both carriage bolts will angle downward when the sawhorses are completely assembled, and this is OK. Put two washers on the bolt in between the legs to allow them swing. Put on a third washer next to the nut, and tighten it.
Step 5: Attach Cross Supports Using Wood Screws
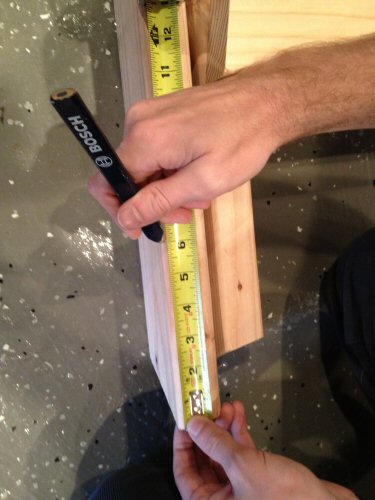
Now it’s time to add the three supports that connect the two pairs of legs. Before you fasten them in place, drill pilot holes to avoid splitting the wood, because you’ll be working close to the end grain. Put two screws on each side, and make sure the edges are flush with the legs. I placed the lower supports 6″ up the leg and the upper support about the same distance down from the top.
Step 6: Install The Strap
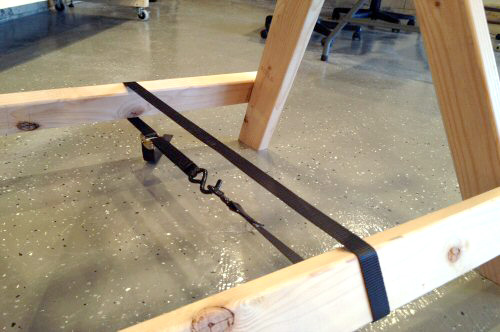
Part of the beauty of these sawhorses is that the cross member is firmly sandwiched in place by the legs. To keep everything nice and tight, use a locking strap (or ratcheting strap) to pull the legs together as far as they will go. You can also use the strap to secure the cross member when the sawhorse is not setup.
Final Thoughts and Pictures
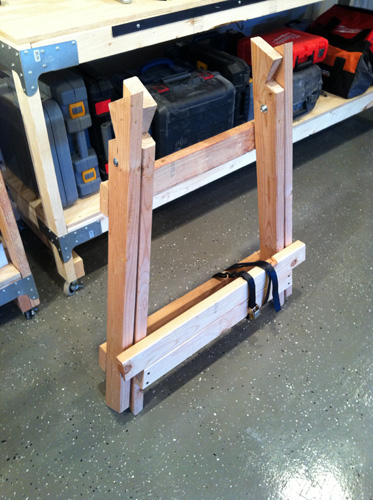
Even though these directions are a bit complicated, the end product is well worth it. This type of sawhorse is very strong and should last a long time. It is collapsible, and the cross member can be modified to better suit your needs. For instance, I’ve seen v-notches cut to prevent pipe and conduit from rolling away. You could also build various height cross members to support differing infeed / outfeed support heights.



You build a couple of them, correct? Now you can cut a couple notches in the top boards to accept 2x material on edge to span both horses. That would make for a very strong temporary table. You could alternatively notch the 2x spans and slip them over the top of the horses too.
We need to get around to the second one. I believe we can complete the second one in well under an hour – just ran out of time after figuring out the first with minimal instructions. For a beginner, this project is probably 2-1/2 hours, just because of the mitre/bevel combinations and the measuring.
That is a pretty serious saw horse, its very nice that the top piece is just a simple 2×4 that isn’t even screwed in, makes it very easy to replace when it gets all torn up.
Couldn’t some of the cuts be combined to a single setup on the miter saw (like the top of one leg going into the bottom of another, and flipping the supports after each cut). That would cut your number of changes to the saw in half, which means less chances for human error 🙂
It is possible that some of the cuts could be combined, at least on one end of the legs. Because of the bevel, it would be hard to cut both ends of the 2x4s together.
I do really like the replaceable 2x material on the top. It allows not only for replacement, but for optional components. Since our tables are a bit higher, we’re considering making an attachment that will put the surface of the sawhorse at the same height as the tables.
i love the design especially since it collapsable. Also i love the idea that you can notch the top pieces to hold pipe and stuff .. i am for sure going to make some of these.
Only one suggestion i would add is: add a 3/8″ drill thru hole, or whatever is closest to the radius of the 2×4 corners, before you jig saw the 90 degree notches. The benefit of this is now you have a radiused corner on the notches and that helps prevent the wood from splitting from side loads, and especially since it is almost in line with the grain, and hold even more weight with that simple modification. Kind of the concept of drilling the holes at the end of concrete cracks, it helps keep the crack from spreading.
This is an excellent suggestion. We have a second one to build and we can try this. 3/8″ is probably close (if not exactly) the right diameter…
I agree with Joe that it’s nice the top piece is easily replaced. As we all know that part eventually gets sawn, painted, hammered, etc. by accident.
Interesting design – I like it.
I love this, very easy to follow your step by step guide!
Great detailed guide. I’m thinking about using 2 sawhorses and a nice board across the top as my primary workbench at my new place. I love how these collapse and could be transported easily. Great work!
I built sawhorses similar to the C&H I-beam based ones you noted (although I didn’t paint them gold!). I like that your design is collapsible, because mine do take up more floor space when not in use and always seem to be in the way.
I really wanted something collapsable because we’re working on keeping the shop as open as possible. I’m very pleased with this design but it took a lot more time than the C&H sawhorses (which I’ve built before).
I love the design (though I have modelled them in 3D to get all the angles etc sorted in my head) but I have a question.
Why isn’t the cross member flush with the tops of the legs?
Assuming the dimensions were correct wouldn’t this make it stronger when supporting sheets between two horses?
I can’t speak for Ethan specifically on why he did this but I have my cross member proud because it serves as a sacrificial piece. I set my circ saw a hair deeper than the material (just to be sure I get all the way through it) and it leaves saw marks in the cross member.
Hey Tom, Jeff is right on. Keep it higher to protect the rest of the horse. Thanks for the question, and let us know how it goes putting them together.
Low cost, high functionality. Instructions will be easily followed. Looks like a good father/ son project. Nice job posting this!
I wondered if you could substitute say a 2 x 6 or 2 x 8 for the crossmember. Then it would be an adjutable height saw horse !
Why did you not give credit to the person that designed these sawhorses? I am the guy that created it, and they are called Shopdogs. This guy has left out some important design features. But look at my website (woodshopdude.com) or search for my YouTube video. I sell a complete 20 page full color set of plans and building procedures with full scale templates, for whopping 5 bucks. At my site you can purchase tensioning straps for 10 bucks.
Thanks…Grant
Hi Grant,
Kudos to you for an excellent design. These sawhorses are great. I’m not sure what “design features” I could have left out. I guess that’s the incentive for people to purchase your plans.
Grant, really you designed these saw horses? So you mean that you designed on your own and never saw or know of one in existence? I would really be surprised!
Would folding stretchers like they have on folding tables be useable here or is the strap nessecary? Seems like another $5 or $10 dollars would add to the ease of use if they would.
Yes: I tried to print the text for your sawhorse . But it will not let me print it. I thank this is the best sawhorse I every saw. Please let me know how I can print it please, I tried to make one but I can’t remember the angle when I go out side Thanks.
Hi Joseph,
The “Print this Post” link at the top of the article seems to be working just fine. After clicking that link, you should see the article formatted for printing, and you can use your browser menu to print it or use the link found at the end of the newly formatted article. Hope this helps.
I built these for my Dad for Christmas and had one problem- The bottom supports need to be different lengths. I initially did both at 32″ but if you look at the picture, it is clear that in order to fold, one leg needs to be 3″ shorter (the width of two 2x4s). I then cut the lower support for leg 1 & 3 to 29″. I could be wrong on this but it seemed like the only way to get it to fold properly.
Kyle, You’re absolutely right. That’s a misprint, and I’ve updated the article. Thanks for pointing it out.
i really like the design of these sawhorses… and as others have mentioned before, it is great that the top piece is so easily replaced. awesome!
Thanks for the “how to” and very helpful pictures. I made mine out of PT wood. Heavy, but all-weather!
Total length of all the lumber pieces adds up to 23.5′. Could you explain how you cut all the pieces with three 2x4x8s and only generate 6″ of waste?
Hi N,
Good catch. I didn’t include the cross member as I just used a spare piece of scrap, and it can be any length you choose.
Thanks. Thought I was missing something!
Built these a couple of weekends ago and can’t wait to use them. Will be putting together a swing set this summer for my kids and these will come in handy when it comes time to measure and cut the lumber. Hopefully these will outlive me and my children will be able to use them. Great design! I think my only modification from your design was that I did not bevel the legs and I just used rope with a fireman’s hitch instead of a come along.
Thanks so much for the plans. I now have a pair or great sawhorses. I do have a suggestion that simplifies the process. To start, all four legs are exactly the same except for the notches. After all legs are cut, turn 2 of the legs upside down. I have a left bevel compound miter saw, but was able to cut all four legs with one setting, 25 degrees right miter and 10 degrees left bevel. Since both ends of each leg are parallel, you place 2×4 on left side of saw and make first cut at right end. Then, move 2×4 to the right 40 inches and make the second cut. Again, move 2×4 to the right 40 inches and make the second cut. Put second 2×4 on saw and repeat the above for the third and fourth legs. Now, turn 2 of the legs upside down. You now have all 4 legs with the correct orientation. Follow directions in the article to make the eight cuts for the notches. If you have a band saw, make the long cut of the notches with leg flat on the table. Lift up the leg slightly at the end of the cut so as not to over cut if you so desire.
Thank you, I thought I was loosing my mind when my second half of the legs were identical to the first half. It would have saved a lot of confusion and setup to have mentioned this.
Precisely, Jerry! I was planning to leave a similar comment, but see you beat me to it by a few years. After test cuts on scrap, I realized legs 1 and 3 are the same as legs 2 and 4 inverted. This allows you to set up your saw, make a cut with the material to one side of the saw, then move the material 40 inches to the other side (through the saw area; don’t flip or rotate the material) and make your next cut. This made it easy to use my saw table with a sliding miter fence and one-way bevel blade.
Did it this quite similar with two 2×4 beside each other, a circular handsaw with bevel and doing miter with a guide rail. Three cuts for the first, another two for the second sawhorse and I was done with the legs.
Makes building this design quite fast and easy…
Really like the simplicity of this sawhorse design. Thanks for the ez to follow steps. Made a couple extra sawhorses for storing lumber off the floor with temporary tables. I substituted the strap with another cross support bolted down with a lag and wing nuts.
When you say the legs should be 40″ long, is that long to short? also, what is the height of the finished horse from the floor to the top?
Sorry, I didn’t read enough of the post. I saw that according to your directions they’d be 36″1/2 high.
You should be able to pick up a free bungee cord on highway. Just for god sakes don’t get run over.. great plans!!!
One question, as I would like to make the overall height of my saw horses 34 1/4. A little shorter than yours. Can I just shorten the 4 legs by the difference (2 inches per leg) or do I also need to change some of the angles. Thanks in advance for the information.
Ron
I took a different approach on the notches. Built the complete horse without the notches, set them up with the tops flat, then marked the top cross member position and made the vertical cuts of the notches with my circular saw. Then I took the bolts out and cut the horizontal parts of the notches at right angles to the vertical cuts. To me it seemed less likely that I would make a mistake cutting the notches.
Another change was to put the inner legs’ spreader between the legs. That makes the horses thinner when they are folded. This wouldn’t work with the woodshopdude plans that have the legs as inner-outer pairs.
Note that you can cut all four legs at one time if you have a compound saw that will cut a 4×8 inch stack of 2×4’s. Most saws will cut a stack of two legs at a time and you should put a matched pair on each end of the horse.
I’ve got two of these going now. I had to build some fence panels for our raised beds and since I had all the tools out decided to cut the pieces for these. I also cut a couple of 10 degree wedges at the same time to get ready to deal with the notches. I just used the 10 degree wedges with my drill press to drill holes at the corner of the notches. It angles through the 2×4 at a 10 degree angle a hole so I now have a cutout in the corner. This should make cutting the rest of the notches easier to do.
I cut a french cleat on the bottom or each upper support and on the top of each bottom support. That way, I can hang one on the wall (by attaching the upper support to a french cleat screwed to the wall) and hanging the other on the bottom support of the one already hanging.
I don’t have a mitre saw so I just threw a pair of these together using a circular saw.
I rough cut each leg a couple of inches longer than I needed so I could cut 4 legs at the same time by clamping them together and then angle the saw to 10 degrees and run it threw 4 legs. The first 4 legs were two sets of 1 and 3 in the picture, then change the angle of the cut the opposite way for the next 4 legs (2 and 4 in the picture). That way I had my 8 legs cut using 4 cuts. No mitre saw and they all end up exactly the same length.
I do not have a miter saw. could I use these plans and just leave out the bevel cuts?
Sholuld be 12 wooden screws instead of 10. 4 screws for each support board. If support boards are also 2×4, aren’t the 3 1/2 inch screws too short?
I think this is a perfect article about building a perfect sawhorse. Ethan gives a detailed explanation(A-Z) to build a sawhorse. But I think buying a sawhorse is perfect for newbies.
3D modelled these and when rotating about the bolt holes the distance between the legs changes thus you’d need a variable length cross member on one set of legs! That or very loose bolt holes to accomodate…
do you have a pdf plans/ template?