
Our house was built in the early 1980s. Back then, Ryan marketed this house as a combination of the elegance of yesteryear and modern-day amenities. I guess yesteryear was quite fond of dividing walls, half walls, spindles, and soffits. Or maybe that was modern amenities? Hard to know.
We knew when we bought the house that more than half of all the interior walls on the first floor were going to have to go. Most of them aren’t load bearing, anyway. The few that are run horizontally down the middle of the house. They’re still targets for removal (at least in part), but we’re leaving that to a contractor.
In four days over the Winter break, we took out nearly all of the non-load bearing walls. The goal: to get a step closer to the open floor plan this house so desperately needs, and to make the best use of limited contiguous home improvement time.
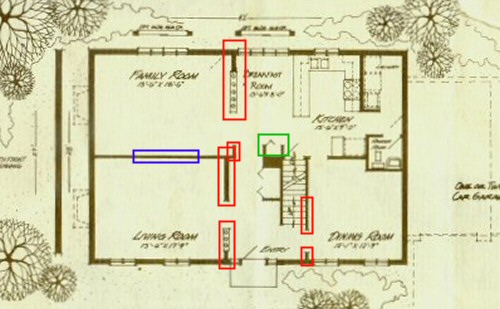
Here’s a picture of the layout of our first floor from the original marketing brochure, with mark-up showing these nasty, unnecessary walls.
How to Decide Which Walls to Remove
As a general rule, we think the less walls, the better. Exterior walls provide ample space for hanging decorations and pictures, and furniture and area rugs can be used to create distinct spaces. The mantra of yesteryear–that each room needs to be sufficiently divided by drywall–certainly no longer applies.
The red markings in the diagram show the walls we decided to remove in round one. These walls created division between the left, center, and right of the house and simply made little sense in a modern design. The portion of the wall to the right of the staircase will be replaced with a banister, while the others will be left open.
Since these walls are not load bearing, they are a prime target for do-it-yourself removal. The joists in this home run from the front of the house to horizontal supports in the middle of the house, and then continue to the back wall. These walls do contain some electric, including the main thermostat, but fortunately are void of plumbing.
We recommend only removing walls that are not load bearing. Review your plans with a structural engineer before you begin to tear down a wall. Make sure to consider how to deal with the electric before removing a wall.
The blue marking shows the location of a load-bearing wall we’d like to remove. Unfortunately, time and finances didn’t permit for this round, but we’re planning on hiring a contractor for that job in early Summer.
The green marking is the location of our kitchen pantry. Since we aren’t ready to redesign the kitchen, we didn’t want to take out those walls yet. We’re saving that project for the Summer, when we’ll knock out that pantry and replace it with a large pantry cabinet that matches the rest of the kitchen cabinets, but will likely put it in a different location.
Re-purposing Rooms
The original layout of our first floor gives us 4 major spaces: a kitchen, dining room, family room, and living room.
The dining room is relatively small for our entertaining tastes, and the duplication of furniture in a living room and family room seemed as unnecessary as the walls we wanted to remove.
We also wanted a new room to support a study environment for our kids. We decided to re-arrange the floor plan to meet our needs:
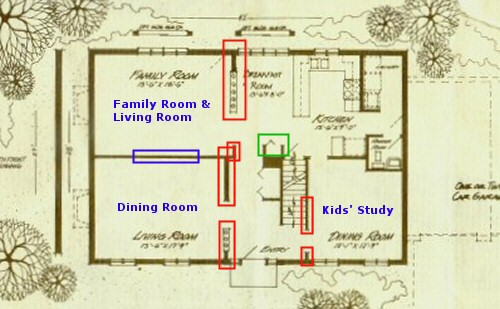
The only challenge of this layout: the dining room lamp needs to be moved and there’s no overhead lighting in what was the living area.
We’ll tackle that challenge when we have a contractor remove the wall between the family room and dining room in the early Summer.
Pictures of Walls to be Removed
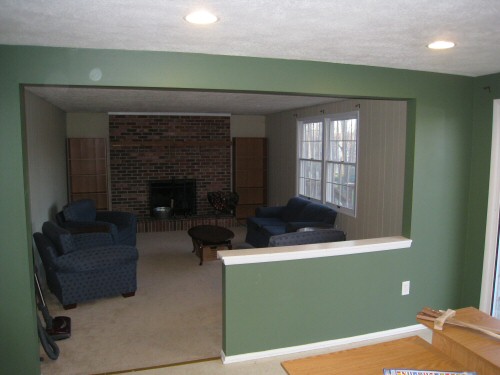
The top-down layout can tell you a lot, but the pictures of the space really show the division. Here’s the wall between the kitchen and the family room:
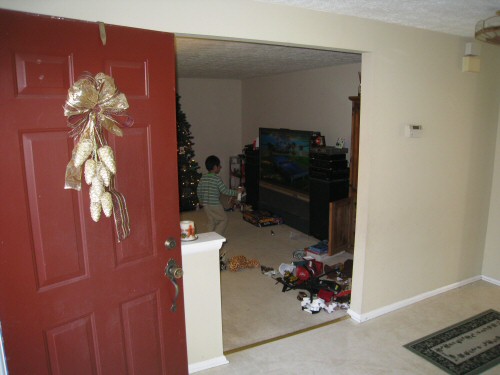
Here’s the wall between the foyer and the living room:
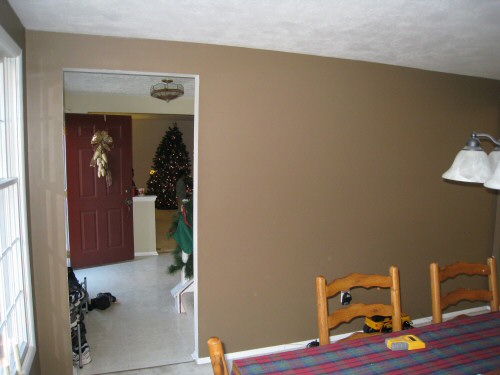
And here’s the wall to the right of the stairs (viewed from the dining room):
Steps to Take Before Removing a Wall
Here’s the steps we followed to prep for removing these walls. Some variation of these is required in every interior wall removal.
Step 1: Be sure the walls aren’t load bearing. Don’t assume; verify! If you aren’t qualified to make the determination, make sure to get the assistance of a structural engineer before you start.
Step 2: Anticipate any electrical, plumbing, or HVAC moves. A visual inspection can tell you a lot: are there receptacles or switches on the wall? Is there a thermostat on the wall? Is there electric on the floors immediately above or below the wall to be removed? Are there HVAC vents nearby or in the floors above?
Even walls that don’t have visible signs of electric might be concealing wiring traveling between floors or around the room. You can use an A/C voltage detector to detect hidden electric in walls.
Remember! It is illegal to splice electrical wires outside of a junction box that is accessible to the finished room. Removing a wall may require you to install a junction box in a less-than-optimal location. Think about the location of any junction boxes before you start cutting Romex.
Step 3: Turn off water at the main (if plumbing is expected), and turn off the relevant breakers in the panel. Reinspect the wall using a voltmeter or an A/C voltage detector before starting tear out.
How to Take Down a Stud Wall
Once you finished prep, you’re ready to tear out walls. The only rule: be willing to clean up any mess you make! We used a corded reciprocating saw, claw hammers, and a pry bar to do the job. Total removal time: 3 hours (not counting a trip to the landfill).
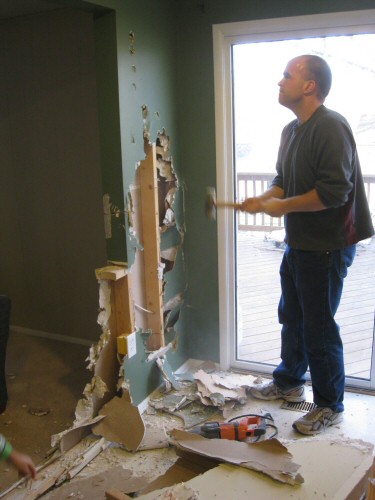
Here’s a picture about 15 minutes in. The half wall between the kitchen and dining room is already out and we’re working on the wall closer to where it joins the exterior:
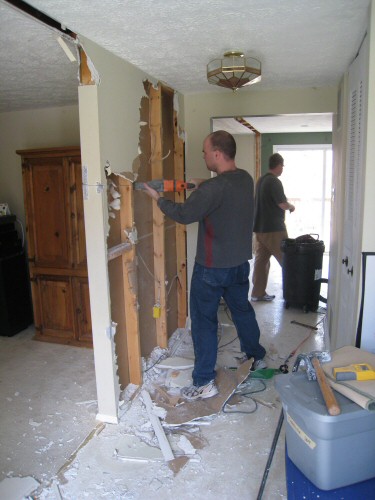
An hour and a half into the project and we’re taking down the wall between the foyer and living room. This wall posed some particularly difficult challenges, including moving a thermostat and rerouting some wires that required an additional electrical box.
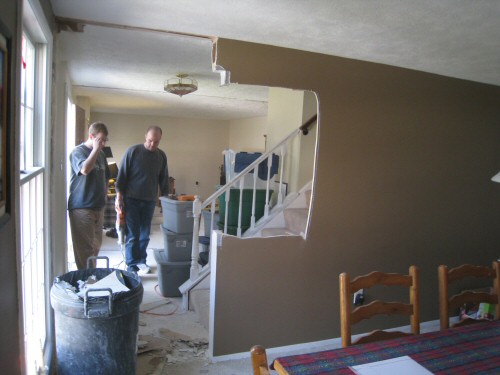
Two and a half hours in, the wall between the dining room and staircase is starting to be removed:
Challenges of Removing Walls
While this renovation didn’t require plumbing or HVAC re-routing, we did encounter a number of challenges that are the subject of future articles:
- Patching drywall on the exterior walls and ceiling where the walls were removed.
- Moving a programmable thermostat to a new location.
- Removing a switch and taking a receptacle off of that switch.
- Moving an outlet to an exterior wall location.
- Re-routing electric that was running to the second floor of the home.
- Dealing with gaps in flooring until we replace the whole first floor with hardwoods.
Pictures with Walls Removed
Truth be told, I’d love to wait to show you after pictures until we had the hardwoods installed, all the drywall patchwork completed, a new dining room light, etc.
But that’ll be months, so you’re going to have to use your imagination a little. Here’s a shot from the study across the front of the house into the new dining room. You can see the new banister isn’t installed yet, and the drywall still needs to be mudded and sanded a second time.
For the first time, you can see all the way across the front of the house with no breaks. Taking the wall back on the staircase made a huge difference in the open feel of the house.
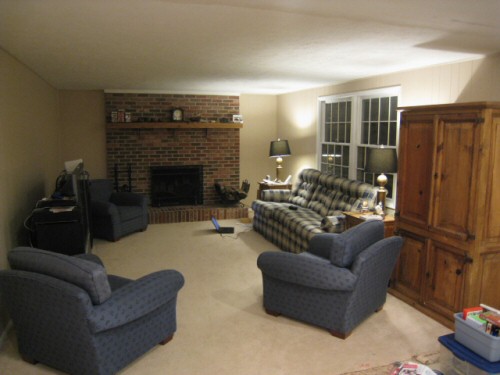
And here’s the family room, as seen from the kitchen, also with some drywall patch work remaining on the ceiling.
A Special Thanks
(Nearly) Completing this job in four days was no small feat, and there’s no way we’d have accomplished it without some help from our friend Chris. Had to give him the shout-out here, since he lived with us for four days straight to make this happen. Big thanks, Chris!
What do you think? Planning to remove walls in your home? Already done the job? Let us know about it. We love to help share inspiration!


Looks good Fred! I’m glad that despite our homes loosing value, you’re able to make yours into exactly how you want it! It’s going to be great! Where’d the fish go?
oops — that should read, “losing value”… 🙂
The difference is amazing, it really is. I think the removal of the wall at the stairs that allows you to see into the (former) dining room into the (current) dining room is the most significant improvement in sheer feeling of openness.
As we said when we finished this, I almost instantly forgot those crazy half walls and random bump-out walls were ever there, because it just seemed natural to have the rooms less divided and more open. Quite an amazing change, looking forward to helping with the floors next! 🙂
Was the wall you removed on the side of the staircase load bearing?
A big messy project but so worth while. The end results are amazing. Nice to have a friend like Chris help you out.
Fred,
Way to go!! I LOVE demo! This project reminds me of our first home where we took down several walls to open things up. It’s amazing how much bigger the house feels after doing that!
Great advice on all the pitfalls!
Be aware that not everyone agrees. There is a growing movement away from “open space”. This is the 2nd house I have moved into and ADDED walls. There can be liveability issues with having large open spaces. Have you read any any of Susanka’s books? I’m not saying what you’re doing isn’t right for you. But it may not be right for everyone …. or even most…
I am very familiar with Susanska’s small house design style which utilizes ‘less’ walls to define space! Susanka utilizes ceiling heights, beams, furniture placement and cabinetry to give a sense of purpose and design. I believe she would always opt for the open stair ‘where’ functionality is still maintained.
Beth – Yeah it’s a bummer on the value deal…. but we’re planning to stay here for a while. It’s like being in stocks 2 Octobers ago. Looked bleak at the time but things have improved.
Emily – I haven’t read Susanka’s books, but I did just search for the name online and am intrigued, so I will check them out if I get the opportunity. My only concern with livability issues would be if we were trying to accomplish two separate things in two separate rooms at the same time, and perhaps the noise floating through the rooms would be a problem. Perhaps a second concern could be furniture placement, although I doubt that will be an issue for us…
The overwhelming advice we’ve gotten from Realtors and friends is to open up the floor plan and put a uniform floor down (e.g., hardwoods). Then use furniture to divide the space. After opening up what we have already, the change is dramatic, and we certainly think for the better…
In general in our house there’s no more than 2 things going on at any given time… Once we finish the basement family room and move our entertainment area there, I believe we’ll be in really good shape to support two activities.
@ Emily – Our new home is very open and we love it. We build quite a few homes every year for customers and the overwhelming majority of them want the living areas (kitchen, dining, living, etc) to be open to facility having a sense of more space and togetherness with other family members. I know in our home we love being able to cook dinner and see what the kids are up to.
Just my observations obviously.
Fred and Kim just wanted to let you know the pictures of the transformation are great. Can’t wait to see it in person. It’s nice Chris was able to help out too! I’m sure it’s nice having the boys away from the Kitchen for school. My only concern would be getting food to the new dinning room, but I know you have one more wall to take care of. After hearing which walls you took out, we were at an open house that was on the small side with the stair case about the same place as yours. I was telling James, it would open there space a bit more too.
Hey Lisa – the dining room/stair wall removal created the most unexpected of the effects – really opened it up a lot… love the effect. So far, getting food between the dining room / kitchen hasn’t been too much of an issue … and I think it’s worth the trade. If we really thought it were a problem we could swap the dining and family rooms, but that would leave the living room without a fireplace, and we really like the fireplace.
The only time it might be a problem is transporting that French Onion Soup at Christmas time :0) We could manage though. I really do like the open floor plan. Looking at the pictures, you look like you’re having to much fun! Great job!
Wow! Your renovation looks fabulous. What a huge difference. The space is warm and inviting. We are in our 4th home and the “newest” (most modern and up to date) we have ever lived in. My husband and I have knocked out walls, hung cabinets, tiled floors, moved plumbing, painted, gutted, peeled/scraped wallpaper, etc. We love older homes, but then we would get into them and the possibilities would start flowing. Now we are in a “new” house that was 4yrs old when we moved in. It is the open floor plan that everybody on the home shows love. The entire back of the house is windows and very few “pieces” of walls. It has been an continues to be a struggle to arrange furniture. There are two floor outets (in the wrong place for our furniture) and almost no place to put pictures of our two beautiful kids. We just bought a 46″ tv and surprise…. no wall to put it on. We are putting it in front of the window wall, but don’t tell anyone at HGTV. I am missing walls these days. I think in older homes, taking walls brings the house into the current times and adds light and openess. The newer homes could use a wall or two (sound barrier, coziness, and to hide my not so clean kitchen !). Your renovation looks great!!
Coury, Thanks for the compliments and we 100% agree with your perspective on this. A home that lacks any interior walls can create big challenges for furniture placement – especially something like a television where the back is pretty ugly…
I haven’t seen you comment on the site before. Welcome!
I am removing an interior wall dividing my kitchen and living room. It is not a load bearing wall. My concern is, how do I create a nice even finish on the ceiling from the living room to the kitchen or should I leave a frame around the two walls?
Anna, the simple answer is that after you remove the wall, you will install drywall in the gap left by the wall removal, and then you’ll use drywall mud over the gaps, then sand smooth. It basically turns into a standard drywall repair once the wall is removed.
Thanks for the input!!
Thank you for showing me how to tear down these walls! Our floor plan is similar to yours. For nearly 20 years we have been unable to see beyond the walls. I have wanted to move for years. Like any Texan I need wide open spaces.
I have spent the past 25 years homeschooling my 5 kids, but now that I am entering the next phase of life it seems I’m the one in need of an education. We are getting ready to renovate the master bath/closet, the stairway and hopefully the kitchen. Until a few days ago, I had never considered replacing the walls of my stairway with rails. I didn’t know it was possible. Your pictures will help us see the possibilities.
When I saw the comment about Susanka, I realized I purchased a book by her this week. Curious, I reread the jacket of Not So Big Remodeling, Tailoring Your Home for the Way You Really Live. Susanka is not opposed to tearing down walls. From the jacket, “Rather than gutting a kitchen, consider removing a wall to connect it to the surrounding spaces and create a more open floor plan.”
Do you have any updated pics? Thanks again,
Dianne, thanks for the comment. We should have linked here to some of the “final” pictures. Check out this article from our hardwood flooring installation that has what you’re looking for!
https://www.oneprojectcloser.com/hardwoods-complete-brazilian-walnut-after-pictures/
I love what you did!! We just bought a similar looking house (we take possesion in 60 days) I need to remove many walls. How can you tell its not load bearing visually? The house also has 2 staircases to the basement, I want to remove one that will create more space on the main floor, can basement stairs be structural ?
P.s I love the hardwood floors too!
Ranya, thanks for the feedback! Hope you’ll bookmark us and stop by and read often. We’re a fun site. Here’s a good article on load bearing wall determination:
https://www.oneprojectcloser.com/how-to-tell-if-a-wall-is-load-bearing-a-k-a-structural/
You can’t rely on just visual inspection though. See the article – it’s all about identifying the clues.
Hi Fred,
Love what you did, the results are great! My husband and I have a similar project here…removing the non-load bearing wall between kitchen and family room. All is going well until we hit a snag…not enough length in electrical wire to move it to another wall. Did you encounter anything like this? Will this require a juction box?
Any advice would be appreciated.
Jill, thanks for stopping by. We did run into the same situation as you. There is one basic rule for short electrical circuits: You can’t splice the wires in the wall. Which means you have a few options: Add a box with a blank cover somewhere on the wall and use the box to extend the wires, or rerun a new length of wire from where ever the short wire starts and all the way to the new box (basically replace the wire that’s too short). The latter option is usually difficult because you don’t know where that wire starts.
You can also join electrical wires in another box, such as a switch, as long as you stay within the electrical code’s limits for the number of conductors entering a box (for a typical single gang box, that’s 7 conductors total (not counting ground wires) in most areas).
I suggest identifying a discreet place for the new box and just putting one in there… that’s the most common solution in this situation.
Thanks for stopping by OPC – I hope you’ll come back often.
I might be reading the floorplan incorrectly…isn’t the dining room too far from the kitchen now?
That was also a concern of ours when we opted for this layout. Had we swapped the dining and family rooms it would have made the table about 10 feet closer to the kitchen. This really isn’t as bad as it looks, though. It’s about 10 steps between our island in the kitchen and the table, and the layout just works really well this way for entertaining…. Had the fireplace been where the dining room is, it would have been perfect for us… Kim really wanted to have the fireplace in the family room.
I am starting a remodeling project, which led me here. I currently rent an apartment and the apartment next store is vacant. I am planning to remove the dividing wall between the 2 apartments. This way I’ll have Lots more room. We dont plan on removing the hole wall, just cut out a 1/2 circle to open it up. My question is should I leave a center pillar for support for the 2nd story.
This is one of my favorite comments of all time… but just in case you WEREN’T kidding….
1) Your lease probably won’t allow you to change the structure of your property.
2) If you do this the roof will probably collapse before you have time to put up the center pillar.
3) Make sure to consult a professional structural engineer and follow all laws before you get started.
But assuming you were kidding…. HAHAHA!
My wife and i recently purchased a Ryan home with very similar floorplan. We are working on removing some walls, the biggest being the load bearing wall between family and living room. Our contractor believes that the hot air duct work runs up in between that wall. If he is correct, has anyone had success with rerouting the duct work so that we can really remove as mush of the wall as possible? Thank you.
If it’s like our house, the ducts have about a six foot space between them. If the basement is unfinished you can see where the ducts run up to the second floor as they enter form the floor below directly above the I-Beam.
loved the project…we just moved to a 1968 home lots of walls, any ideas how to create an open space….has a powder room inthe center….dont know how to do it…any ideas???planning to remove the wall beetween breakfast room and family room.but no idea what to do with the kitchen and living room since powder romm it;s right there…
I have a wall in the entry way that I’d like to remove. There is a vent in the wall but i don’t believe there’s any electrical. Can the wall be removed? I’d like to take a picture of it & post… can i do that here?
I’ve been trying to figure out how to move my laundry when I stumbled upon your website. Thank you for putting up the blue prints and the marketing material!!! Do you know if anyone has actually taken down the wall between the kitchen and laundry? I don’t blog but I’ll keep you posted when we actually go through our plans.
Finding this link was great. I have the exact same floor plan. Manassas, VA built in 1980. I have been planning on removing all of the same walls. I’m curious what the contractor said about the load bearing wall. Did they give you span options? I want to remove that wall between the living room and family room almost entirely (except for a header and posts at the ends), but it all depends on cost. I’m going to have an engineer give a plan for a 16′ span. That may mean a steal beam/header. To the person asking about the wall between the kitchen and laundry….That wall, at least in my case, contains the plumbing from the basement up to the second floor. You can move it, but all of the plumbing and electrical in it need to be moved. I have thought about just making it a mud room or the pantry. If i do, I will make the upstairs rear bedroom closet the laundry with a doorway from the hall (4 bedroom layout). Then I would put the closet for that room next to the closet for the front corner room.
Hey, have you gone ahead and removed the load bearing wall between the living room and family room? We are looking at doing that and seeing what kind of issues you ran into besides the fact that its load bearing.
I am very familiar with Susanska’s small house design style which utilizes ‘less’ walls to define space! Susanka utilizes ceiling heights, beams, furniture placement and cabinetry to give a sense of purpose and design. I believe she would always opt for the open stair ‘where’ functionality is still maintained.