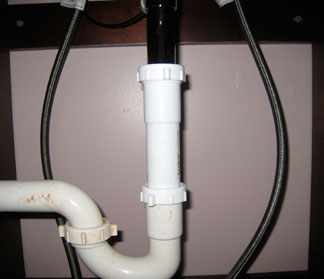
I finished installing my new Tropic Vanity and bathroom sink over the weekend. The installation was nice and smooth- no unexpected surprises. I used flexible steel supply lines for the hot and cold and slip joints to connect the drain to my existing trap.

Often, plumbing requires soldering copper pipe or gluing PVC. These are tried-and-true methods but for connecting a simple sink drain, there’s an easier way.
Slip joints refer to a “mechanical union that allows limited endwise movement of two solid items for example, pipe, rod, or duct with relation to each other”. It’s a great way to create an in-line connection but keep in mind that it’s a mechanical union- not a soldered joint or chemical connection (PVC glue). The connection is achieved when the large threaded nut compresses the tapered gasket making a water-tight seal.
How to Install a Slip Joint
Here’s an easy tutorial on using slip joints with my bathroom sink as an example.
Materials
The first thing I did was stop by Big Orange to pickup the right parts. Most sink drains are 1 ½” diameter and my drain was about 3″ short of the trap so I needed an extension too. Here’s my short shopping list:
- 1 ½” PVC slip joint with 6″ extension
- 1 ½” PVC slip joint to connect to my existing trap
 Assembly
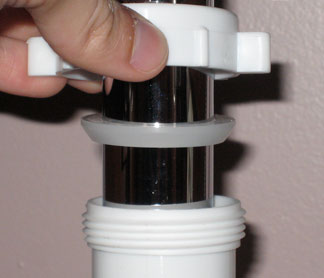
Start by dry fitting everything to ensure appropriate lengths. Cut the PVC as needed and remove any burrs. Place the slip joint nut first, followed by the plastic gasket. You should position the gasket at least an inch up the pipe as this is where the joint will occur. Also, orient the gasket so that the wider end is adjacent to the nut (see top picture). Place the other connection and tighten the nut.
Pros and Cons
As with everything, there’s good and bad.
Good
- 3 minute install
- Easy removal for repairs or cleaning
Bad
- Not as solid / durable as soldered or glued PVC joints
- Can loosen over time causing leaks
What do you think? Any tips for using slip joints?


It may sound simple, but make sure you insert the gasket in the proper direction. Many initial leaks are caused by this basic oversight. Ask me how I know 😉
@Matt, Your right. It’s easy to get confused and reverse the gasket. Fortunately, a lot of these fittings come “assembled” with the right orientation.
Ethan, the closest to plumbing I get is calling over my plumber friend to do it for me! ha
There are some things I just won’t do. However, if I did install a sink myself, I would definitely try these out.
Even with very limited plumbing skills, I successfully managed to replace a piece of 1/2″ copper pipe which was leaking by using a ” SHARK” fitting. No soldering or compression required.