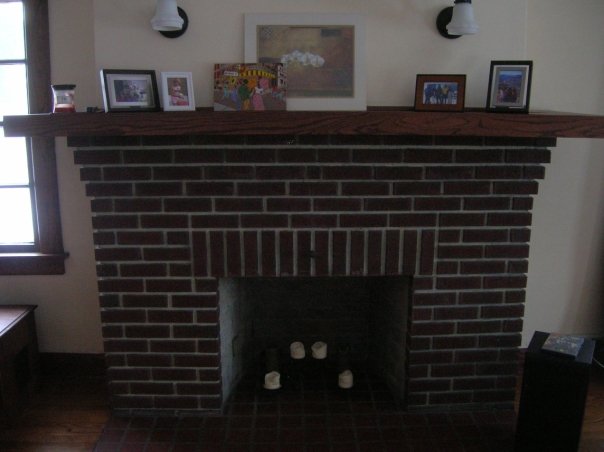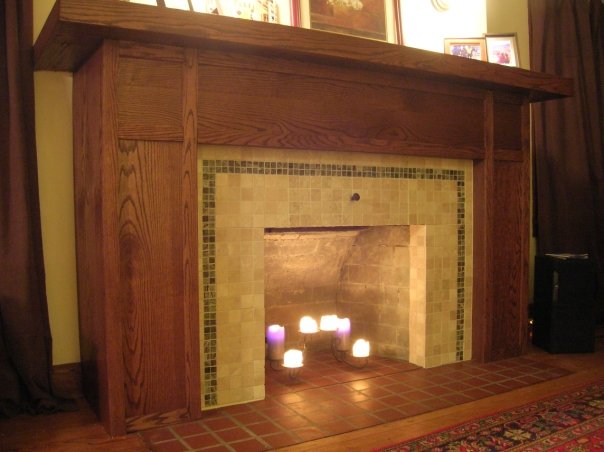
 This is the first Before and After of 2009 and it’s brought to you by Colleen! Colleen and her girlfriend just refaced their living room fireplace. It was an amazing transformation.
As a result of Colleen’s article, OPC will make a $35.00 donation to Habitat for Humanity. Colleen also gets a $25 gift card to her choice of Lowes, Home Depot, or Amazon. Lastly, Colleen is entered in our end-of-summer contest for a $150 gift card to the home improvement store of her choice! We’ll be voting on a winner at the end of September.
Check out this great Before and After and be sure to leave a comment.
Fireplace Reface by Colleen
This past winter, my girlfriend, Wendy, and I refaced our livingroom fireplace using red oak, travertine tile and marble accent tiles. In a few weekends the fireplace went from an ugly, dated red brick eyesore to a fabulous focal point. While we had tackled various other home improvement projects in the past, neither of us had really tried something like this before. Needless to say, it was a learning experience. But we took our time and worked deliberately, and we’re absolutely thrilled with the results. And the best part? I got to add a jigsaw and a hammer drill to my tool collection! Sweet!

Fireplace Before
The first thing we did was attach 2x4s to the existing brick to act as furring strips since the bricks were stepped out beneath the mantel. Looking back, I’d say this was the worst part of the project. I truly appreciate my tenant downstairs for tolerating the noise we made with the hammer drill that day. Once the furring strips were installed, we used 3/4 plywood to rough in the apron, pilasters, and return, thus ending day one.
Because the mortar joints between the bricks were fairly deep, we used a thinset mortar to level the surface of the surround, and gave it about a week to cure before starting the tile installation. During this week we must have went through a dozen different dry runs for the tile, trying different configurations before finally settling on a final design. But all that preparation paid off when the tiles went up without a hitch.

Fireplace After
The final stage of the project was to apply a red oak 1/4 inch ply veneer to the plywood box we’d built earlier. I was the most nervous about this part because of horror stories I’d read about sanding and staining plywood. I had spent 2 months refinishing all of the woodwork in the livingroom and diningroom, and really wanted the fireplace to blend in the with the old woodwork. No worries, though, in the end it matched perfectly.
All in all we learned a lot in the course of this project. Lessons we’ll apply the next time, when we reface the downstairs fireplace. 😉
Thanks from OPC!
Colleen, thanks so much for your article. The fireplace transformation is amazing! This is a great way to kick-off our Before and After 2009 series.
Habitat Challenge 09
Any 2009 Habitat Challenge gift will go twice as far to help provide safe, decent and affordable housing throughout our global community! A group of anonymous donors has stepped forward with an extraordinary pledge to match every dollar you send to our 2009 Habitat Challenge – up to a total of $1,100,000. So please be generous today!
We hope you’ll consider taking on the Habitat Challenge 09. Make a donation that goes twice as far.
Submit Your Own Entry
This is just the beginning of our series, so there’s still time to finish projects and submit articles. Even if your article isn’t selected this week, it may appear later in the summer. We will run one article each week through September 20, 2009.
E-mail submissions in just about any format to oneprojectcloser@gmail.com. Best of luck with your projects!
What do you think? Let Colleen know what you think of this great project.


Great job! The new look is amazing.
I love it! What a fabulous job.
Fantastic! The tile work is beautiful. Great job Colleen, (and Wendy!) 😎