 Installing framing members on a slab requires use of a pressure treated bottom board to avoid wood rot. Concrete slabs will wick moisture between the underlying dirt base and the wood members sitting on top of the slab. If untreated wood is used for the bottom board, the high moisture level will promote rapid decay.
The obvious way to incorporate a pressure treated base board is to use one in lieu of a regular untreated board for the bottom member of the wall. This method is the least expensive because you only need to swap out the untreated bottom board for a pressure treated board, and build the wall just as you would using all regular studs.
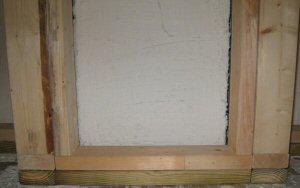
An alternative to this method is to fasten a pressure treated board on the slab first using a powder actuated nailer, then build the walls using all untreated members and sit them on top of the pressure treated board. This method has several advantages and a few disadvantages. Overall, if offers a good solution for DIYers because, even though it costs a little more time and money, it simplifies the installation. A picture of a section of wall built in this manner is shown in the upper right of this article.
Advantages of a Separate Pressure Treated Bottom Board
- Easier Visualization. Fastening the pressure treated boards around the room first will allow you to better visualize the final room before you’ve built out the walls. If you decide to change anything about the room at this point, it is relatively simple to remove the bottom board and you haven’t wasted much wood.
- Easier Baseboard Installation. A separate pressure treated bottom board increases the nailing surface for baseboard installation. This is particularly helpful if you plan to install a floor with significant depth (like a radiant heated floor with a stone tile, which could be as tall a 1-1/4″.
- Walls are easier to move around the room before installation. Since the wall can be 1-1/2″ shorter than the height of the room, walls are easier to “scooch” around the room to their final location without worrying about hitting the ceiling. This is particularly valuable in rooms where the distance between the floor and ceiling varies by more than 1/4″ or so. This is also helpful if you don’t want to move your wall building station around the floor.
- Ease of Installation. It is easier to fasten the individual pressure treated boards using a powder actuated nailer than to do the same with an entire wall. If you misfire one of the nails using the powder nailer, or split the board, you need not worry about rebuilding the wall.
Disadvantges of a Separate Pressure Treated Bottom Board
- Increased Cost. The cost of the job is increased by the total cost of the additional untreated bottom board required for the walls. Lumber yeards are getting about $0.22 per linear foot at the time of this writing. This means an additional $22.00 / 100 feet of wall.
- Increased Installation Time. Fastening the pressure treated board first requires additional time because you must address each portion of the wall twice. There is some time savings that offsets this increased time, particularly if mistakes are avoided using the two-board method.
Tools Required to Fasten the Board
Fastening the pressure treated bottom board to the slab is simple. For the DIYer, a hammer drive powder actuated tool is your best bet. The Ramset Hammer Drive Tool is Available at the local Big Boxes for a decent price, as are the charges and nails you’ll need for this job.
You should buy approximately 1 nail and charge for every 2.5 feet of length of wall for the average room. (e.g. if you have 250 linear feet of wall, you should get 100 nails). You may also want to have 10-20 charges and nails spare in case of misfires/splits. Note that the charges required for the job vary by the type of surface your nailing into.
A Good Book on All Things Basement
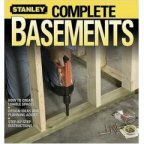
 Finally, if you’re looking for a great basement finishing book that provides more information on this topic and many more in great detail, check out Stanley’s Complete Basement Finishing Book. You can find it at the library or most online book stores.
We’re a big fan of Stanley books for their ease of use, clarity, and their step-by-step approach to projects. (It was just a cooincidence that the cover of the book shows this very topic using the single-board approach).
What do you think? Have you ever used this technique to frame on a slab? Leave a comment below and let us know if this helped!


Fred,
Nice post. Your idea will certainly help some folks especially when it comes to standing up the wall between two fixed points (slab and floor joists above).
I wanted to point out one thing to your readers. Before you start shooting power actuated nails into the slab just make sure you don’t have traditional radiant heat tubes in the slab. It’s not that uncommon for folks to completely forget about the tubes being in the slab, shoot a nail in and have one VERY huge mess on their hands!
I would add one more step to your process as well. We like to use the powder actuated nails in addition to a really good adhesive like PL400.
Fred & Ethan,
You guys always have the best info! Because you rock, I’m passing along a blogging award to you. It’s waiting on my blog…
Blessings,
Tyler
Great tips. I would like to add a few thoughts…
I work for a contracting company and we do a few basement finishing jobs a year. For the real cost conscious homeowner we frame the walls with metal studs. In our area, 2x4x8s are almost $3 per board compared to about a buck for a comparable metal stud. Every metal stud you buy and install is straight, resulting in nice straight walls. Wood stud quality is spotty. We typically have to order extra studs, maybe 10% more, than what the jobs calls for since we’ll most likely find many twisted studs that are unsuitable for wall construction. At $3 per board, that extra 10% extra in material is money out of the homeowner’s pocket. With metal studs our material orders pretty much match our need. There is no real need for over stock since any changes to design are easy to implement since you just unscrew the stud and relocate. Using metal studs is actually very easy and once you get the handle on how to work with the stuff you can move pretty quickly with the framing. I can gang cut a half dozen studs and zip screw them together in 2 or 3 minutes.
A common concern initially is about the sturdiness of the metal studding. When standing on their own, they do appear to be a bit flimsy, however when you install the drywall that flimsiness disappears and you’re left with a very sturdy and solid wall. For walls that will carry a hanging load like cabinets or a plasma TV we’ll strategically add horizontal wood blocking. 90% of the time, picture location never line up with a stud anyway and some type of “molly” support is used. Pulling wires and plumbing is really easy; just tap out the “knockouts” (provided they are lined up correctly when the studs are installed) and install rubber grommets and you ready to pull wire. We will frame door entries with solid 2×4 wood in order to provide a solid backing for jamb installation.
More to the point of the article above, if you insist on using wood studding for the perceived added strength but you still are looking to maximize every dollar you can substitute the bottom PT board with the U-channel used in metal studding. The U channel sits flat on the floor and then a “regular” 2×4 is laid flat inside the channel. The metal U-channel acts a barrier between the concrete and wood frame. The downside is that when you install the base molding you have less real estate to plant your nails since the bottom plate is now only 1.5” thick as opposed to almost 3” when using 2 bottom plates, however you are eliminating the extra cost of that PT bottom layer on all your walls.
I worked with a guy a few years ago and he even eliminated the entire wood top and bottom plate and used just the U-channel. He would install the top and bottom channels and then insert each wood stud into the channel and zip screwed the channel (from the face) to the stud. Since he didn’t have a bottom plate to nail moldings to he would use some constructive adhesives and nail the moldings at the stud location.
Ryan, fantastic information! Really appreciate you providing it in this forum. Ethan wrote a post on using metal studs to frame out an area, noting some of the benefits you describe here.
I hope you’ll continue to stop by and add some experienced wisdom to these articles!
There is nothing like the wood for sturdiness – I don’t like the metal because it doesn’t seem strong enough. It probably is, but I just don’t feel confident when handling the studs. If I go into a job and the basement is really dry and the customer has never had a water problem – I don’t mean dampness, all basements have some level of dampness, I mean water, I’ll use regular not treated wood studs on the floor.
I feel confident that I am giving my customer a good stud and not having to increase the price for something that they may not need.
If you consider that you put down a PT bottom plate (or sill gasket with a regular plate as I do) because of the possibility of moister from the concrete, the metal bottom plate will more than likely rust.
Hi, I am planning on using this method for my basement. What is the best way to attach the standard wall to the extra pressure treated bottom plate? Screws? Nails? Thanks!
Hi JS, The best way is to use the same framing nailer that you’ll use to build the walls with – usually a pneumatic or fuel-cell powered version like this Paslode we’ve reviewed:
https://www.oneprojectcloser.com/paslode-cordless-framing-nailer-review-new-cf325-battery-fuel-cell-model/
I’ve used this technique in my basement with great results.
I highly endorse the Stanley Complete Basements book you noted – I used that and a couple others during my basement build, but I found myself going to the Stanley more than the others.
love reading these old posts from before I found your site. Stanley’s Complete Basement Finishing Book will be an excellent resource.