
Updated 5/10/11 with more details and information:
Hardwood flooring is one of the most popular upgrades for today’s homes, and for good reason. The hardwood flooring association of America reports that 90% of real estate agents say homes with wood floors sell faster and for higher prices.
Over the last decade, do-it-yourself wood floor installs have rocketed as hardwood companies cut out the retailer and sell directly to consumers. Basic wood floor installation is the perfect candidate for a DIY weekend (or multiple weekend) project. The hardwoods at the right are a great example of an easy project to carry out with the proper tools.
Below, we’ve featured the tools we like most for this job and highlighted the links at Amazon and Toolking (our two favorite online tool joints). There’s a short list at the conclusion of this post where all the tools are grouped into one place for reference. We like Amazon for their favorable shipping policies (often free) and no sales tax in most places, and Toolking for the wide selection and no sales taxes (although in our experience Amazon often has lower prices).
The remainder of this post assumes you have a basic understanding of installing hardwood floors and what you’ll need to complete the job. If you don’t have any idea where to start, we suggest getting a good reference. You can start online with our Hardwood Flooring Installation Guide. It gives a basic overview of the installation process. We also recommend picking up a flooring guide like Stanley’s Complete Flooring.
Stanley’s Complete Flooring covers hardwood installation and includes a wide range of floor types (not just hardwood installation). It’s a useful reference even beyond your first installation project. If you’ve settled on installing hardwoods, you can pick up Stanley’s guide along with the tools you don’t already own that are highlighted below.
Recommended Hardwood Floor Install Tools
#1) Toe Nailer for Fastening Hardwood Floors
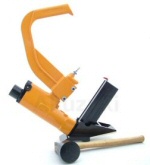 The most important tool for hardwood flooring installation is the hardwood flooring nailer, also called a toe nailer because it drives cleats through the edge of a hardwood flooring into the subfloor or joist below.
Hardwood flooring nailers fall into two overall categories: manual and air-powered (pneumatic) nailers. We highly recommend a pneumatic nailer. While manual nailers are cheaper, they are hard on the installer, tend to under-drive nails and split boards, and may produce a looser installation (for example, leaving small gaps between the planks). Pneumatic floor nailers are a bit more spendy, but well worth the added cost to protect your flooring investment.
Unfortunately, most pneumatic hardwood flooring nailers are expensive ($399+ for a realiable, brand name nailer). For DIYers, Amazon also sells a much less expensive Hardcore Tools Pneumatic Hardwood Flooring Nailer (usually around $240 shipped). If you’re planning on doing a single home’s worth of hardwood floors, we think this air nailer is your best bet for the job.
#2) Mitre Saw to Cut Flooring Boards
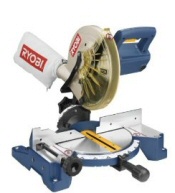 If you don’t already own a decent mitre saw, installing floors is the perfect time to purchase one. Mitre saws range in capabilities and price. For hardwood flooring, you need only a basic saw capable of making 90 degree cuts and the occasional 25-45 degree cut to work around an obstacle (for instance, stairs or support posts).
If your goal is only to complete this one project, we recommend an inexpensive saw like this Kobalt Miter Saw. Of course, if you can borrow a mitre saw, that’s even better for a single project.
#3) Finish Nailer & Compressor Combo Kit for Trim
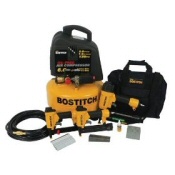 The beginning and end boards in a wood flooring job cannot be installed with the toe nailer because the nailer cannot fit close to either the start or the end wall in a room. In these cases, a finish nailer should be used to secure the boards in place by performing a toe nail function (for the 2-4 board from the end) or by top nailing the boards (for the last 1-2 boards). A finish nailer will also be required for the installation of the baseboard and the installation of quarter round or shoe molding trim. Follow those links for our instructions on doing this for your own floors.
We are huge fans of reconditioned finish nailer and compressor combo kits available on Amazon. This Bostitch kit includes a compressor (which you will need to power the hardwood flooring nailer and the finish nailer), a finish nailer, a brad nailer, and a crown stapler. We’ve heard good things about this kit from our fellow bloggers, even though we own the Porter Cable version. Even better, the Bostitch combo is slightly cheaper.
#4) Table Saw For Ripping Boards Length-wise.
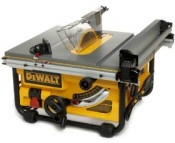 It is possible, although not probable, that you can perform a complete hardwood installation without a table saw. A table saw is only required if the last board in a room cannot be laid at full width. For example, if you are laying 4 inch wide planks, and only a 2 inch space remains at the end of the room, you will need to rip a board (rip means to cut it length-wise) to complete the installation.
During installs where we haven’t had a table saw available to us, we simply lay the entire floor and then run to a friends’ house or local shop to get the final board cut. If you’re doing multiple rooms or foresee a need for a table saw in the future, we recommend the DeWALT DW745 Heavy Duty 10-inch Table Saw. The saw boasts plenty of horsepower for a variety of woodworking tasks and is a great addition to a DIYers tool kit.
#5) Jamb Saw for Cutting Door Jambs
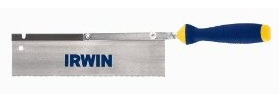 There will be places in a hardwood flooring installation where the trim pieces around doors needs to be cut a little higher than the existing floor so that hardwood can fit underneath. There is no need to remove the molding from the doors; you can simply cut the molding in place using a jamb saw.
Jamb saws come in manual and power models. We prefer the hand tool because it is about 10% of the price of the power tool and the amount of cutting required in the typical installation does not warrant the fully automatic version. We’ve used and really like the Irwin Pro Touch Flush Cut Reversible Jamb Saw. At under $10, it makes the job easy at a price tag that doesn’t break the bank.
#6) Miscellaneous Tools for Everything Else…
In addition to the tools above, it’s also very good to have the following tools on hand:
- a 35-foot tape measure to provide accurate measurements,
- a chalk line for setting a mark for the first board and ensuring you stay straight,
- a nail set in case you need to sink a few nails below the wood surface by hand, and
- an additional rubber mallet for tapping boards into place (in addition to the mallet you need).
Our favorite part about a hardwood flooring installation is the variety of tools you can purchase that are reused on later DIY jobs. With the exception of the hardwood flooring nailer, every tool in this list is used on dozens of other DIY projects that you’ll likely tackle in the future.
Best of luck with your installation!
What to you think? Would you make any changes to our list? Weigh in below and let us know.
First image courtesy of Juhansonin.


I wish I had just purchased the hardcore nailer you mention in this review. Since I’m doing most of the house in hardwood, the rental fees are adding up…
Corey, I know exactly what you mean… In fact I was going to do a little analysis of renting vs. buying a nailer after I found the Rocket Tools model… Owning the nailer significantly relieves the stress in the project.
Ethan just finished his floors and worked 4 individual days to complete most of the first floor. This tool practically pays for itself on that job alone… Plus, with the reviews its getting, looks like it has a pretty good life. I probably wouldn’t rely on it for many jobs (unlike the bostitch model which comes with a 7 year warranty).
Great article, I just wanted to mention that I’m a huge fan of the DeWalt 18V cordless finishing nailer. I’ve used one for all of the trim and finish work in my house (about 1000′ so far) and I’m in awe of how good, but simple it is. I’d say it takes me 20% less time than using an air nailer, and easily 50% (or more) less time than doing it by hand. Most of my friends, my father, and my father-in-law (who was a home builder for more than two decades) love it and borrow it for their projects. Aside from a monsterously powerful DeWalt mitre saw (sliding, compound, dual-bevel, laser guided!) my cordless finishing nailer is my favorite purchase of the 21st century, thus far.
-Jon
Jon, good suggestion on the electric nailer. I looked for an electric hardwood nailer and none exist (can’t get the PSI needed, I guess). But, if you are going to rent the compressor and nailer, then an electric finish nailer makes sense.
I’ve personally done baseboard and quarter round by hand. I think it’s more like 90% faster to go automated myself. Plus, I constantly hit my fingers due to tight spaces (I did a bathroom). The finish nailer is a must… just rips right through the project.
What if I am using hardwood flooring glue? WIll this work on wood? I am using it for two room with concrete slabs, but the master is upstairs and the subfloor is wood. Does this mean I have to use a nailer, or is teh glue acceptable for wood?
Kris, I would use staples in a first floor installation. I have used glue successfully but it is a harder, messier installation and may not have as tight a hold as staples in the long run.
Hi my name is Albert Joseph I would like to know what is the best tools to use when you install hard wood floor when you get close to the wall I don’t like the neil gun will you help
Hi Albert, tool #3 in the list above is the thing you’re looking for – a finish nailer. It will allow you to blind nail boards where the flooring nailer won’t fit. Blind nailing is driving a nail diagonally down through the board, just over the tongue. Once you get too close to the wall (last 2 rows, usually), you’ll have to top nail them in. The nail holes will show. If you are laying finish-in-place floors, you can just put some wood putty in the hole, sand, stain, and seal. If you are installing pre-finished floors, you’ll have to accept the small visible imperfection. We have pre-finished floors and it doesn’t bother us one bit that there are a few boards up against the wall with visible top nail marks.
hi,
I have an Akuzuki 799 pro flooring 2 in 1 nailer,stapler and need parts, do you know where I can fin replacement parts?
Thank you!
Chris
Unfortunately, I do not.
HI-
I am hoping that I will be installing unfinished red oak and will have to blend with existing red oak (installing about 1500sqft and blending with another 1000sqft or so). Should be an interesting project! This article is very well written and I thank you for your effort!
“How to install quarter round?” and “How to do install baseboards?” are not working and seem to be broken. Would you please check and see if they can be fixed?
Thanks again!