We’re back with another deck build Pro-Follow update this morning. I’m shadowing general contractor and carpenter Steve Wartman and his crew through the process of building a new composite deck. Our last update left off with the stairs going into place. At this point, the “bones” of the deck (posts, beams, joists, stringers, and band board) are all set. Before we jump into laying the deck boards, it’s important to address flashing the ledger board. Today’s article covers both of these topics.
Step 8: Flash the Ledger Board
Contractors use flashing to prevent water and moisture from finding their way into a home. The general idea is that since water flows down with gravity, you can overlap waterproof membranes (like siding, stucco, metal flashing etc.) that will direct water away from the house. Improperly flashed decks can cause a lot of problems, because leaks may not be visible right away, and they are not always readily diagnosed. Furthermore, making repairs after a deck is finished can be a very onerous task. (Although some deck construction methods make it easier to address such challenges than others. We talk about that below.)
The Unique Situation with this Deck: The exterior of the house is a combination of brick and block. The ledger board is fastened to the brick, which is already constantly exchanging moisture with the outside world. Since the masonry anchors Steve used do not penetrate deep enough into the brick to disrupt the moisture barrier, Steve’s crew is confident that this deck does not require separate flashing. (There is no path for water to enter the home.) Typically, the crew would err on the safe side and flash anyway; however, in this installation flashing would be visible and would detract from the look of the finished product.
This situation with this deck is unique because the ledger board in this design is not a load bearing element. This deck is free standing, with two sets of posts and beams on which the joists sit. In most decks, the ledger board is load bearing, and the bolts go all the way through the rim joist of the house. This situation always requires flashing to prevent leaks.
If the crew had decided to flash the deck, here’s how they would do it:
- Trench out one of the horizontal mortar joints above the ledger board enough to insert an inch of copper flashing.
- Before inserting the flashing, bend a small double-back hem that will act as a wedge between the bricks.
- After inserting the flashing, seal the joint with a flexible sealant.
- Make sure the flashing extends down over the ledger board.
- Cut the flashing at each floor joist in order to get the flashing between joists to bend.
Our final How To article on the deck will include several resources for properly flashing decks. Since improper flashing is a leading cause of dissatisfaction with a finished project, you should pay particular attention to this element in your own build.
Step 9: Lay the Composite Deck Boards
Steve’s crew is installing Trex Transcend composite decking boards for this build. The homeowners are really excited about this, because composite decking is almost completely maintenance free. They won’t ever have to worry about sealing, stripping or brightening the boards. The band board and stair risers will be wrapped in a white, Trex composite trim.

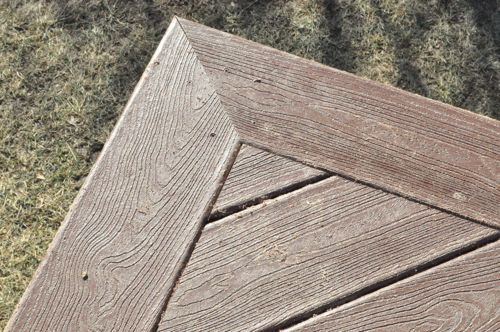
Trex is a capped-stock, which means the core of the board is composed of a different material. For that reason, exposed ends are especially undesirable, and Steve’s crew will be running a “picture frame” around the perimeter to conceal the board ends.

The guys know that the house wall is not 100% straight so they rip the first piece of Trex in such a way as to eliminate as much inconsistency as possible.

They cut a 22.5° scarf joint to conceal the transition from one board to the next.


Steve’s crew is using screws designed for composite decking. If you look closely, you’ll notice that the top is reverse threaded.


Screwing down the deck boards is slow going because each screw needs to be pre-drilled to prevent the board from disfiguring. Besides the added cost of materials themselves, this step makes the installation of composite decking more expensive than the installation of traditional pressure treated products.

After the guys get two adjacent pieces of the “picture frame” in place, they start laying the diagonal boards. It’s important that the first board be laid accurately, because it will act as a point of reference for all of the others.

Steve’s crew cuts the end at a 45° and measures the opposite side to ensure the angle stays true.

Each board is secured with two screws at every joist.

Tip: You can opt for hidden fasteners that are driven into the side (rather than the face) of the deck boards. This requires a specialized jig and incurs some extra cost.
All decking (composite and traditional) will expand and contract with changes in weather, and it’s important to adequately space each board to provide that necessary room. To achieve a uniform spacing, Steve’s crew sets up a block with 8d nails to create the gap. This spacing is recommended by Trex.

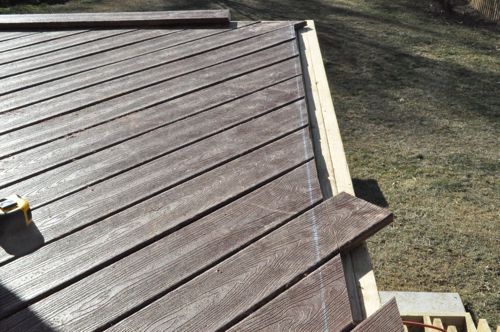
This picture shows the progress after a few rows have been laid.
Tip: Trex composite features a wood-grain inlay to make the boards look more like a natural product. The wood grain is a pattern that you’ll see repeated many times over the length of a single board, and if you’re not careful to stagger the pattern, it will be readily apparent to anyone looking at the deck.

After the diagonal boards are in place, these ends will be trimmed with a circular saw.

Tip: Even though I describe this as a 12 x 24′ deck, it will actually measure a few inches shy of 12′. If the homeowners had truly wanted a 12′ deck, it would require Steve to purchase 20′ composite boards since they’re being installed diagonally, and that jumps the price up significantly. By making the deck just a little shorter, Steve can purchase 16′ composite boards and provide a more cost-effective solution.
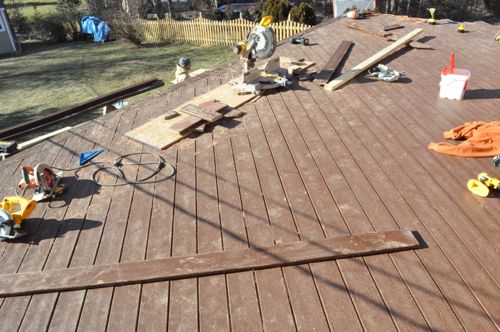
Here are some images that show how the deck progressed.


They snap a chalk to mark their line for the circular saw.


At the end of the day, the guys finish boarding except for the stairs. Look for that and details on installing the white trim and rail system in my next Pro-Follow update. Stay tuned!


This looks fantastic! On many decks a diagonal brace is installed underneath the joists to eliminate any movement. I did not notice that on this deck, but since the decking is installed diagonally in so many planks, am I right to assume that gives it the rigidity for that purpose?
I’m no expert, but my understanding is that the diagonal bracing sometimes seen underneath is for taller decks to prevent racking. I suspect the diagonal pattern of the Trex boards is purely an aesthetic choice.
Eek565,
Thank you. Racking was the term I couldn’t think of. That’s what I meant to ask.
Hey Simon, The diagonal boards are for looks only. Trex is surprisingly flexible so these boards will not act as braces at all. I’m not sure when you’d expect to see the diagonal bracing underneath, however with two rows of posts, this deck is very solid and racking won’t be a problem. Thanks for the comment.
Simon, I’ll try to get more data on the diagonal stabilizing board. I don’t see that on most traditional decks in this area, but I do occasionally see it on add-on rooms. It is designed to prevent racking, and I’m not sure if there’s a specific code standard that is met with that brace or if it is just additional backing. Perhaps Ethan will be able to ask Steve on the next edition of this follow. Thanks for the comment!
Ethan and Fred,
Thanks very much for following up diligently, especially since it was just curiosity on my part. Ethan, two rows of posts would probably do the job, I imagine. This deck looks like it can take a serious beating with some of the storms that can come through MD.
Good stuff, guys!
I checked with Steve’s crew and they haven’t added any diagonal bracing on the decks they’ve built.
Yeah, I was going to ask if the diagonal decking had any other purpose than aesthetics.
Another great series of posts that I’m following with great interest. What does the reverse threading on the top of the screws do?
The reverse threads actually hold the fastener in place. The screw-head is more of a plug than anything else.
Big box stores have started carrying joist flashing tape in the past couple years that goes on top of all the joists. Presumably for longevity of the joists. All the major brands make their own version, Grace, Cofair, and Protecto-wrap. Was there any talk of using that on this project?
Another great series of posts that I’m enjoying and dreaming of doing someday at my own home…or paying a crew to do.
Nice looking deck but I want more pics of Ethan!!!!!
Almost done!
I’ve always flashed the ledger on decks I’ve built (regardless of whether it was through bolted or not) because of the chance of water getting trapped between the main structure and the ledger board which could cause problems with the deck (but not necessarily the house) I take it there’s no worry of this happening here?
I’m of that opinion too. On my own deck I put the ledger on top of the furring strips that make up the rainscreen. I have a 3/4″ air gap behind the ledger (and all of the siding) but the ledger is still flashed in the same plane as the siding. If water does somehow penetrate the siding and gets behind the ledger it runs down my vapor barrier.