
Today’s article is a guest post by John from Our Home From Scratch. Before I turn things over to John, I wanted to let you all know that Brittany from Pretty Handy Girl hosted last weeks Before & After story. If you’re not familiar, every year we run a Before & After series supporting Habitat for Humanity. Show some love, and check out the awesome outdoor kitchen remodel!
Ever since I started doing even basic woodworking, I wanted a router table. Granted, there are a number of higher priced items on my woodworking wish list (cabinet saw anyone?), but the router table has always been a mainstay. Although I primarily rely on my miter saw, table saw and occasionally a jointer for the bulk of my home projects, I still see the potential for a whole host of other projects with a router table. I did try using a friend’s small bench top router table just to see how it worked. It was older and metal, and I believe it retailed for around $100. It was terrible. Maybe they’re okay for very small projects, but I was left completely unimpressed. I’ve also seen some of the larger custom units built by more serious woodworkers. They usually have more drawers than my dresser. I like them a lot, but I never have a ton of free time to put into one of those. I’ve also owned a basic router for years and used it on a handful of projects and I never had the need for an actual table, until now.
My wife and I are currently installing raised panel wainscoting in our dining room, and it’s finally time for a router table. A couple of months ago, I built a basic workbench for my basement out of some plywood, melamine, and 2x4s. I thought I would be clever and try to build my own custom router table out of the scraps that were left over. I have to say, it works pretty well. The keyword here is “works.” It’s not as fancy as some of the larger cabinet units. It’s got some mistakes, and I’ll share a few “lessons learned”. Even so, it gets the job done. The basic structure is very simple, and if you’re interested in building something similar, you can make it even more simple if you choose to.
Step 1: Build the Legs
I started the construction with the legs. I used 1/2″ plywood and tried to join the pieces with pocket screws using a Kreg jig. I didn’t have much luck with the pocket screws on 1/2″ material, so I just used a lot of wood glue and brad nailed it together. The length of the legs are based upon a total table height of 33″. The best part of building your own router table is you can completely customize the dimensions. If you’re a taller person, you can make it a little taller or vice versa. I encourage you to come up with your own dimensions that are tailored for you working comfort.
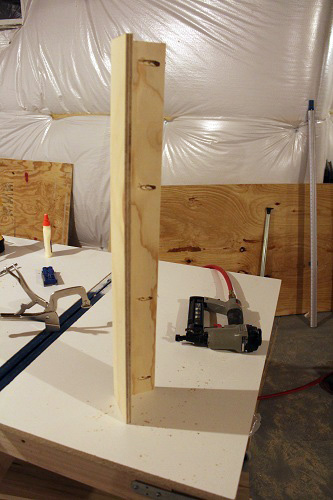
Step 2: Brace Legs
The four legs are exact copies and are joined together with a couple other plywood pieces. Again, here I just used a lot of wood glue and brad nails. A better design would be 3/4″ wood with glue and Kreg pocket screws, in my opinion. The length of those brace pieces depends on how wide or deep you want the table.
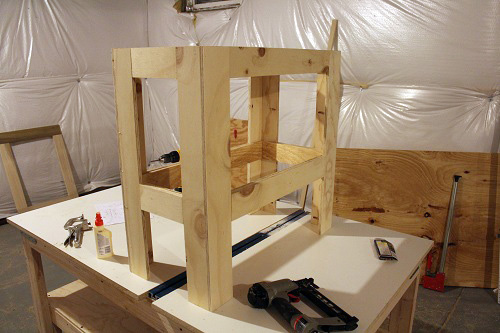
Step 3: Add Casters
Caster wheels make this table much more mobile.
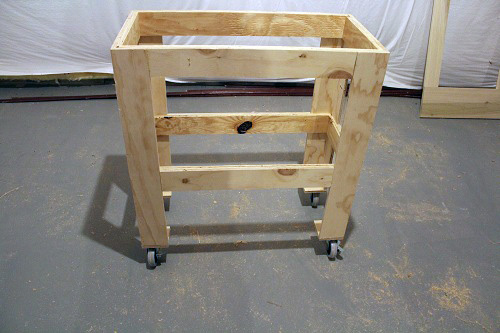
Step 4: Build the Work Surface
With the legs completed, it’s time for the top. My table top is 32″ by 18″. It’s constructed from a piece of 1/2″ plywood glued and screwed together with a 3/4″ thick piece of melamine. The melamine is the actual work surface and is perfect for a router top since it has a smooth, durable skin. Before I join these two pieces though, I’m adding a slight upgrade. I’m including a few t-track sections that I bought on Amazon that will make the fence easier to adjust and lock in place. It can also accommodate a feather board if I ever make one. Once the melamine top is cut to accommodate those sections, I’ll join them permanently. You certainly don’t need the t-track. You could always improvise a fence with a couple of piece of wood and some c-clamps. I’m not going to lie though, the t-tracks are nice!
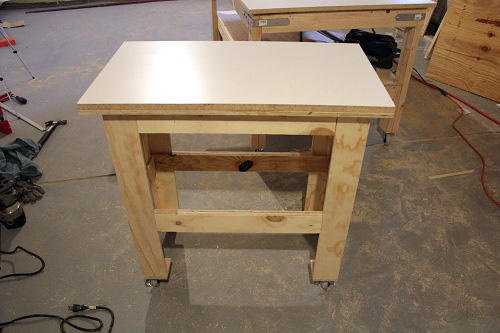
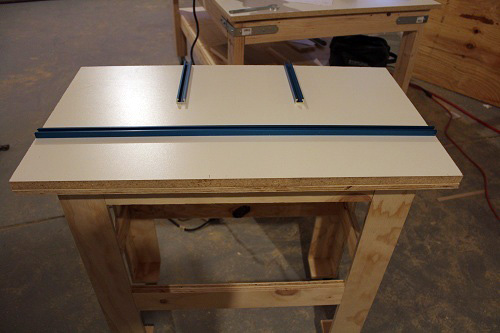
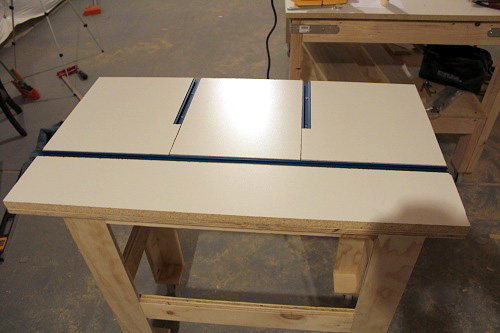
Step 5: Mount the Router
The router is mounted to the middle melamine section, which will remain removable so it will not be glued to the plywood. Most commercial router tables feature an adjustable router mounting plate, but there are some cheaper models. This table’s design allows you to swap out that melamine section and replace it with an identically sized piece, but one with a router bit hole to accommodate the bit you’re working with. In this case, I’m using a large raised panel bit, so the access hole will be large as well. If I use a smaller bit for a future project, I’ll swap that section out for one with a smaller hole. It’s not terribly convenient, but still user-friendly. It sure beats paying for those commercial plates!! The router I’m using is the Porter Cable model shown. It will be bolted to the melamine plate and will sit in a hole in the plywood.
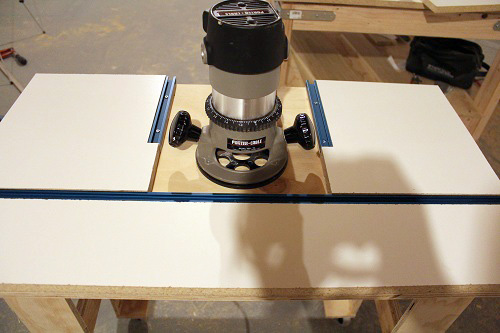
Step 6: Add Paddle Switch and Vac Port
For added safety, I’ve incorporated a paddle switch for powering the router. It’s much safer than reaching under the table and looking for the switch. You do need to reach under the table to adjust the bit height though. Simplicity has its trade offs.
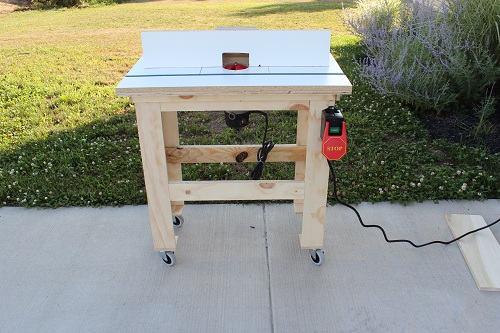
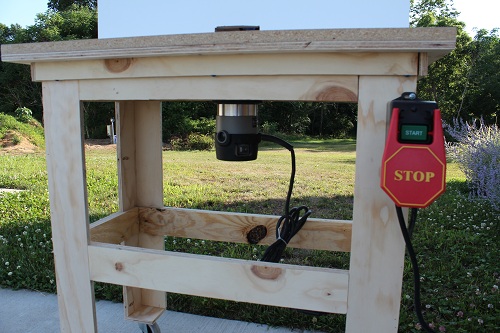
The fence is just two pieces of melamine that are joined together using Kreg pocket screws. The bottom piece had a hole drilled in it on each side to allow for the t-track handles. To adjust the position of the fence, those knobs are just loosened and the fence can be moved and then locked down again into place. The back of the fence also features a dust collection port that was sized for my shop vac. The port is just glued and screwed into a piece of plywood that sits behind the router bit. The front of the fence also needs to have an opening that is a little wider than the router bit you’re using.
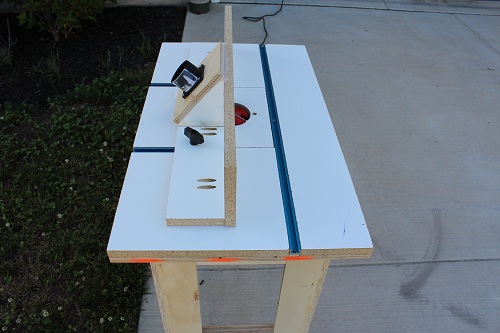
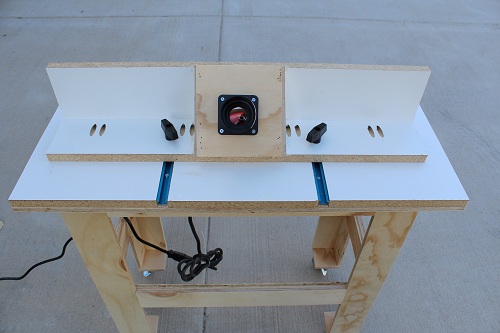
With the router mounted, I wrap the table top in some additional plywood to keep it centered and anchored to the base. I haven’t permanently fastened my table top to the base, however. This feature allows me to break the table down to two primary components, the top and the base, for easy transportation in and out of my workshop.
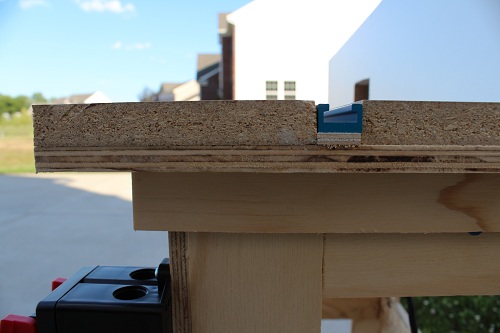
There are a few boo-boo’s here that you can learn from. First off, melamine is finicky. It has a tendency to chip when cut unless you’re using the right type of saw blade, which is a triple chip blade. It also chips when it’s drilled, which made drilling holes in the top a little sloppy. MDF would be a great alternative if you don’t want to use melamine. I also didn’t make some straight cuts with my jig saw for the opening on the fence. I think it may be time for a new one ;). I’d like to reiterate that 3/4″ thick stock may be a better option for the base.
All in all, it’s a pretty basic design that is totally customizable to your needs. This particular table happens to meet mine. It wasn’t terribly challenging to build and I was able to knock it out in a few hours worth of work. I hope this post will encourage you to be creative with your workshop needs and to build your own router table or whatever else you require. Sure beats paying for it!!
John and Lisa are homeowners that blog about their DIY projects at Our Home from Scratch. Some of the projects they’ve done this year include installing hardwood floors, sliding cabinet drawers, landscape lighting and drip irrigation.


Thanks a lot guys. You’ve just diverted an entire weekend away from finishing my basement so I can build that AWESOME router table!
Seriously, looks great and would be a fun project. Thanks for taking the time to put the article together.
Jason
Has anyone replaced the extension on their table saw to incorporate a router? I was thinking something along the lines of this Benchdog product. I know it’s not nearly as cost effective as John’s table, but I was curious what everyone thought.
I have. I took a ton of pictures and may send it in as a write up. I used a router lift too.
I’d love a write up! Especially because we basically have the same table saw.
nicely done. So you’re saying it “works” better than your friend’s $100 small bench top router table but just isn’t fancy?
Icarus, “works” may have been too general of a word choice. In my opinion, bench top routers aren’t very comfortable to work on and tend to be a bit flimsy. The advantage of a full sized, custom dimensioned router table is it allows you to work at your comfort height. Additionally, building a large table top will enable you to route larger pieces with a lot more stability compared to a smaller top you see on the commercial bench top versions. Another bonus is I sized the height of my table to coincide with the height of my workbench, thus giving me a large in/outfeed table.
Thanks for posting guys and thanks for turning me on to John &(OHfS)… my router is one of my all time most favorite tools but I usually use it under far less ideal conditions than on a table. & any time I start thinking about/ shop for a table, I abruptly stop . . . Because I do not like what I find. This might be a good option here… one day, maybe. ha! Happy 4th all and cheers. ~jb
Thanks for the write up. I’ve been debating buying a small ryobi router and table as a starter option but this gives me a bit of confidence that I could build a better product.
Cool post. I have a small Ryobi table & router. The whole thing (including the router) was just shy of $100 if I remember correctly. But it’s probably only about half the size of this table (and of course not mounted waist-high on casters). It does the trick for me pretty well, but it’s not perfect. Certainly something larger, heavier, and more stable would be useful. The results I’m getting from my Ryobi table aren’t perfect, but I never know if it’s the table’s fault or my own fault…
Another great article. Thanks!
Thanks to Ethan and the OPC gang for letting me post on their awesome site!!
Hi there,
Did you use pocket screws to join the boards that ended up being the legs of the table? I plan on making my own very similar table to this quite soon. Great article!
Thanks!
poiboybf, I ended up using 1/2″ plywood with glue and brad nails, but I would recommend 3/4″ plywood with pocket screws and glue. 3/4″ would be more stable and stronger. Best of luck!
Got it. Thanks! Great article. I plan on putting mine together this weekend. I have some extra 3/4 inch for the legs, so I’ll do that and try the pocket screws. I took your advice and went with some t-track for the fence and the guide rail. Thanks again!
One last quick question here… what brand and size casters did you use? I looked at HD this weekend and the ones they had there that locked did so, but there seemed to be just a little bit of play even when locked (ball bearings are tough to lock completely with no wiggle, I guess). Have you just found better casters than me, or do you just live with a little wiggle. Also, the fence on mine incorporates featherboard. Works great and would be an easy addition for you! Thanks so much!
Good question about the casters. Unfortunately, mine do have a little bit of wiggle. I try to eliminate that by wedging a shim or something near them to keep it steady. If you know where you’re going to keep it, you can also completely skip the casters or incorporate a wheel base that is removable. I like the featherboard idea.
So I ended up not putting on casters at all, and it’s very stable, but less mobile. I did mine the same way you did with the top separate, so in two pieces I can just pick them both up and move them. In an ideal world the table never needs to move, but my basement workspace is most certainly not the ideal world. Thanks so much for the inspiration and help!
This is my project for next weekend! Been looking at router tables forever, but I haven’t been able to find something that will fit my space and the budget… this should do the trick.
This rocks- my hubby has been wanting a router table for some time… now I will tell him he can make his own. hehehe!
Big Fan!
I have a question…why you didn’t used 2 X 4 for the legs????don’t you think they will be more steady than plywood…..also what kind of T-track did you used, I mean the measures…..I’ll try to make this one during the weekend…..thanks
Luis, plywood is generally more stable than 2x4s, although you could use that. Plywood strips have a better wood glue to volume ratio than 2x4s. I think if you built a base out of laminated plywood strips vs 2xs you’d be impressed with the plywood.
That’s a nice table. I think I will try to do it this weekend. Thanks for sharing1
I made this and it came out awesome. I lowered the lower side rails from (what looks like 8 inches), all the way to the bottom. Then I inserted a little box for 3 drawers. Thanks for the idea!
Im kind of disappointed that besides the top, theres literly no measurments on specs.ie: how wide and deep is the base, height of base etc etc.
How did you mount the router to the table. I see that you have it placed in the open spot but I am not able to picture how you mounted it.
Thanks I want to build this one after searching and I am going to be doing cabinets.
I am looking forward to making this table it is just what I need . Thank you!
[…] a lot of money and get that table for your shop that you always wanted. This is not an ordinary DIY router table this one by oneprojectcloser has wheels on the bottom so it can be moved wherever it’s […]