A quick tip for small patches in homes with textured ceilings: you CAN do it yourself with materials you probably already have in your house.
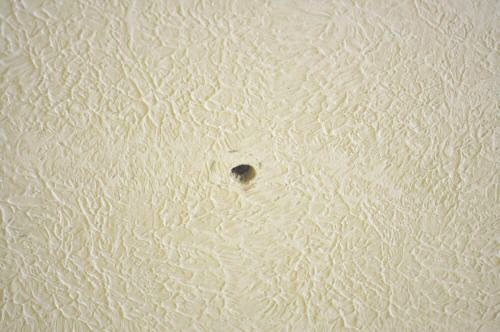
I ran into this job while prepping our guestroom to be painted. The prior owners had swagged lamps hanging from hooks on the ceiling in that room. Not our style. So I got rid of the lamps and took down the hooks, but it left me with round holes.

Here’s how I fixed them.
Editors Note: Hanging drywall and making drywall repairs is a popular topic here on OPC, and if you’re looking for more information, I’d encourage you to check out the “Related Content” section at the end of the post. There you’ll find a few hand-selected articles that we think you’ll find helpful.
Tools and Materials Needed
- Fast-drying Drywall Patch Compound
- Putty Knife
- Paint Brush
- Painter’s Tape
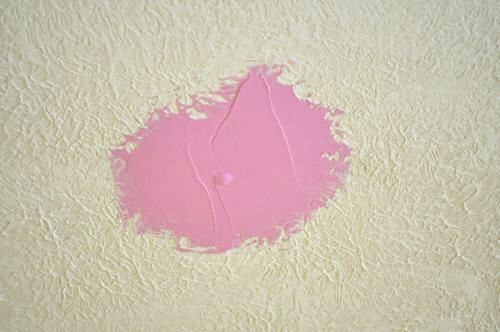
Step 1: Using Drywall Compound, Put a Layer in and around the Hole
(I prefer the “goes-on-pink” kind because it’s fast-drying as well as making it pretty obvious when it’s dry enough to be painted.)

Step 2: Using Tape, Bind the Bristles of an Old Paintbrush into a Round or Oval Shape
(I used a 3″ this time because I found one that was all “crispy” and no longer useful for painting, but ordinarily, I wouldn’t have chosen one that wide for this small a space.)
Step 3: Load up the Bristles with More Compound
Step 4: Apply the Compound from the Bristles in a Quick Up-Down Manner around the Whole Newly-Patched Area
Turn the brush different ways to keep the texture from being too uniform and adding more compound as you move around.
Step 5: (Extra Step if You Don’t Want Sharp Points.) Gently Graze the Tips of All the Points with a Spackling Knife to Take Them Down
(Note: if you mess up and scrape it too flat, just immediately re-do step 3 and try again.) You can skip this step if the “pointy” look is what you have everywhere else. We sanded everything else, so that’s why I added this step.
Step 6: When Dry, Paint the Whole Area to Blend to the Rest of the Ceiling
That’s it! It cost me nothing to do: used very little compound, a bit of tape, and a brush that was headed for the trash anyway. (Though if you don’t have an old brush, you can also clean the compound off any brush you plan to use again. Just clean it immediately after use, so nothing clumps up in your bristles.)


Another option for hiding that repair is a old scotch brite pad to scrub the points and edges.
This will give you the effect of the multiple coats of paint on the wall/ceiling and will be invisible.
If you are repairing a recently painted ceiling and only want to blend it, use a light bit of paint and dry brush .it out from the repair. Done properly you will need a tape measure and a photo to figure out where it was.
Great tips – thanks Alan!
I have found that a big sponge (with large holes) works really well for touching up the sand texture as well. Your repair looks seamless!
That’s a fantastic technique. I’m filing it away in my brain for later use. Beats the heck out of using texture in a can. Now to find a technique for popcorn texture. Maybe a small pointed craft brush will raise stiff peaks.
That would be good to find. I accidentally stepped through our attic floor/master closet ceiling a few years ago and I hated using the texture in a can stuff b/c it was too messy.
Not bad. I would have stuffed the hole with some compound and hoped no one noticed. this works much better.
That’s still a step up from our FIRST approach which was to take down the ugly lamps and then just leave the holes there “till we got to it” … 2 years later! 🙂
As the owners of an older house, we are dealing with cracks in the ceiling. The previous owners filled them but it is definitely noticeable because the repair is smooth and the ceiling is not. Thanks for the great tips on how to blend it with the textured ceiling.
This should work really well for this situation. Our ceiling has the advantage of texture without pattern. We still have not found an easy way to do a repair like this where you are dealing with both texture and pattern (e.g., via a patterned applicator). Much harder problem to solve then.
How about doing it on a popcorn ceiling? Our home has a few popped nails
We haven’t tried it on a popcorn ceiling, since all ours are the pointy stippled kind (and Jocie and Ethan are blessed with smooth, normal-looking ones!). But I imagine you could try a rounder brush and maybe smooth it with your fingertips before it dried all the way. But like I said, we haven’t tackled popcorn, yet! Let us know if you do and figure out a great solution!
Thanks for this tip. I was trying to figure out what to do with a hole in the ceiling without having to spend a lot of money. Instead of a paint brush I used one of those sponge paint brushes. Worked really well. Still need to paint, but already it looks like it is going to work
Glad to help, and thanks for the tip about the sponge brush, Rose!