
Just about every homeowner I meet has significant apprehensions about undertaking plumbing projects. Perhaps it’s the tools involved (you’ll need a propane torch and several other special purpose tools)… but we think more likely it’s the fear that a misstep will result in a flooded basement, or worse, a flooded basement while the family is on vacation.
The reality is that while plumbing can be a bit challenging for the beginner, with the right preparation, tools, and instructions, it’s a task that can be accomplished by just about anyone.
Are you inspired? I hope so. Because in this article we’re going to take on one of the most intimidating projects for first-time plumbers: replacement of the main water shut-0ff valve in the house.
Before we get started, there’s a few things you should know:
- This article covers replacement of a gate valve with a ball valve in a standard 3/4-inch copper pipe. Other plumbing setups (e.g., PEX) will require different steps.
- In some jurisdictions, you must be licensed to perform plumbing tasks, even in your own house.
- I’m not a plumber, just an avid DIYer who likes to tackle these jobs. Use these instructions at your own risk…
- And finally… the same basic steps can be applied to any copper valve replacement, so once you master this, you’ll be ready to tackle all types of copper plumbing tasks.
Tools & Materials Required to Install a Main Valve
If this is your first plumbing task, chances are you won’t have most of these tools. Most of them can be purchased at the local Home Depot, Lowes, or plumbing supply shop. Note that many (but not all) of the tools and materials are pictured below. See the lists for the complete set.
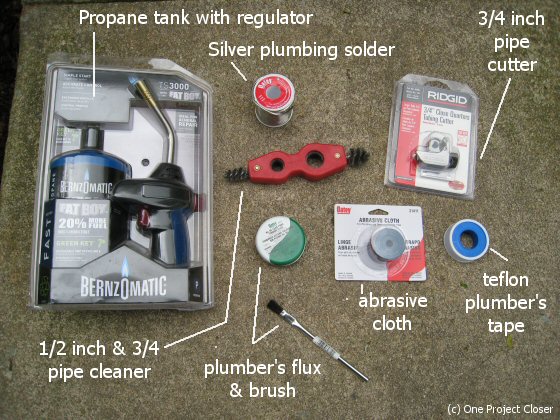
Tools
- Propane torch with regulator & sparker
- low profile 3/4-inch pipe cutter
- Fiberglass heat-stop pad (-not shown-)
- 3/4 inch pipe cleaner and/or abrasive plumber’s cloth
Materials
- New 3/4-inch ball valve (-not shown-)
- 3/4-inch copper pipe (-not shown-)
- Sleeves, elbows, and other connectors for 3/4 inch copper (-not shown-)
- Silver solder
- Plumber’s flux (& disposable brush)
- Teflon plumber’s tape (not used in our example, but would be used if any of the pipes have threaded joints).
Steps to Install a Copper Pipe Water Main Cutoff
Step 1: Turn off the main water cutoff valve at the street or the closest upstream valve from the valve to be replaced. You must be able to turn off the water reliably at another stop. If the main valve is leaking or burst and you cannot locate the city’s water stop or it isn’t functioning, you should call an emergency plumber immediately!
Step 2: Depressurize water in the house by opening faucets and valves at the lowest possible point. Usually this is a basement bathroom or a utility sink. Open several faucets or valves and allow the water to drain until it stops dripping from the faucets. As a last resort, you can use the drain valve on the water heater for the hot water line, although this is usually more effort than using a sink.
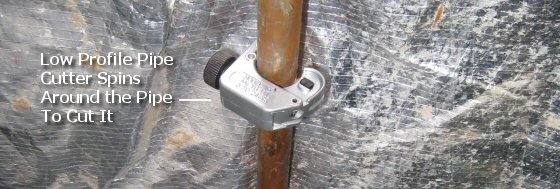
Step 3: Use the low profile pipe cutter to make two cuts — above and below the existing valve. In some cases, you can make only one cut and then unsolder the other joint. In almost every installation you’ll have to make at least that one cut, since it is usually impossible to get the water out of the pipe so that you could unsolder both joints. This picture shows how the pipe cutter attaches to the pipe.
Regardless of whether you cut or unsolder the joints, remove the segment of pipe that includes the valve. Note that you want to minimize the amount of copper you remove, especially from the line coming into the house. You don’t want to have to replace that line, so make sure you aren’t cutting too close to the entry point of the house.
Step 4: Dry out the inside of all pipes near the cut out. Depending on the configuration, you may need to carefully stick a rag or paper towel down into a pipe to dry up standing water. Make sure no water is in the pipe within 16 inches of the solder point. If any water is near the solder point, you WILL NOT be able to get the pipe hot enough to melt the solder. Be sure not to let any part of the rag or towel remain in the pipe, as it will ultimately create a clog somewhere in the line when repressurized.
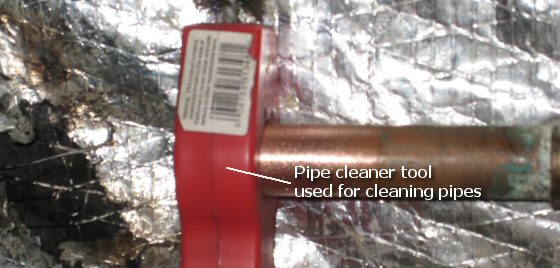
Step 5: Cut new pipe components to size and dry fit the new ball valve with appropriate sleeves and elbows into the gap created by the original valve removal. Using the 3/4″ pipe cleaner (pictured below), brush clean the inside and outside of all pipes in the spots where they will be joined. If any pieces cannot be dry fitted snugly, locate and sand off any burs using the abrasive plumber’s cloth. DO NOT try to bend the pipes’ edges to fit together – this never works and will make the joint weak. If you do bend the edge of a pipe, recut it. The picture below shows using the pipe cleaner tool to clean one end of the pipe.
Dry fitting is important! This is your opportunity to make sure that there is plenty of overlap between the sleeves and the pipes they cover. You should also avoid using pipe pieces that are so short that two sleeves, or a sleeve and the ball valve itself sit too close together. It may be difficult to get a tight bond in these cases.
Step 6: Double check the area around where you will be soldering the joints. Ensure:
- There is no water in the pipes close to the solder points.
- You have brush cleaned all surfaces (outside of pipes, inside of sleeves and inside of the new valve).
- Dry-fitting is successful, no components need to be forced, and the result looks “professional”
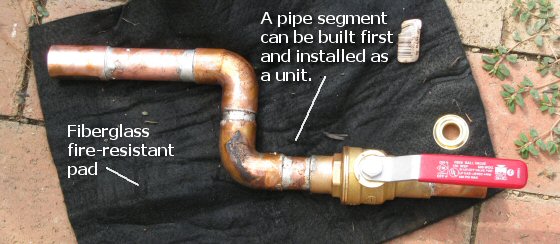
Step 7: Disassemble the dry-fitted components and prepare them for solder. We’ve writte an extensive how-to article on sweat soldering copper pipe joints that is a good stand-alone reference for this step and includes pictures. Note that you can assemble and solder a subsection of the pipe if you have a complex path and then install the subsection as a unit, as pictured below. But remember, you have to physically install the subsection into the existing pipe, so you may need to leave one sleeve completely loose so that you can put the segment into place and then slide the sleeve up over the new segment.
Basic Steps for Sweat Soldering:
- Brush plumber’s flux on the outside of the pipes and inside of the sleeves where the joints will be made. Ensure that the flux covers all areas adequately and that no areas that are to be soldered are “dry.” The flux will pull the solder into the joint as it evaporates under heat in a process known as capillary action. This is a very important step and care should be taken to ensure full coverage.
- Refit all the copper pipe components in place. This should be exactly the same as dry-fitting, but all of the components should now have plumber’s flux on them. Note that the ball valve should be open for soldering, not closed. This is important for a number of reasons, one of which is that a closed valve will create unnecessary pressure in the pipes when you heat them up with the torch.
- If anything flammable is behind the area where you will be soldering, ensure it is protected with a fireproof pad. Home Depot and Lowes both sell fiberglass firestop pads that are rated up to 2500 F and are suitable for working with propane. It may be good to double-over the pad, especially for beginners.
- Ensure you’re working in a well-ventilated area and light the propane torch. Apply heat to your first solder joint which is normally the lowest joint in the setup. As it heats up, you will begin to see the flux boil on the pipe around the joint. With a torch on full blast it will probably take about 10-15 seconds to reach melting temperatures. Touch the solder to the edge of the joint and wait for it to melt. When the joint is hot enough, the solder will melt and get sucked down into the joint by the evaporating flux. While you may see a rim of solder develop around the exterior of the joint, realize that the real seal is made in the joint itself, the full way up and down the pipe joint area. This is what makes a copper pipe solder joint so strong. Move the solder around the edge of the pipe to ensure a total seal.
- Move progressively through the next few solder joints. heating up each joint and applying solder.
Step 8: Examine your work to ensure everything is tightly soldered and you are confident there are no leaks. Once you turn the water on, if there is a leak you will need to recut the pipe to fix it (since there will be no way to unsolder joints once water is in the pipe).
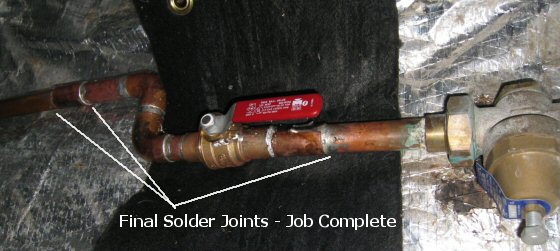
The picture below shows the final installation. Note that there were 3 solder points for final install: (1+2) The sleeve at the left that had to be slid down onto the incoming pipe before the segment was installed, and then slid up to cover the bottom of the segment, and (3) the final solder of the top sleeve to the outgoing pipe (that sleeve was built as part of the segment).
Step 9: Turn on the valve upstream from the joint. Inspect your work for leaks. One way we like to check for leaks is by using a dry paper towel. Sometimes a copper pipe can become very cold when the water is turned on and “fool” you into thinking there is a leak. If there is, the paper towel will begin to get wet and it will be obvious. If it doesn’t get wet, you’re all set.
Step 10: Relax and be proud of your work! If you’ve followed the instructions and there’s no leak at your first inspection, your odds are very good that you won’t ever have trouble with your solder joints!
Questions? Feel free to post them in the comments… or leave a comment about your own pipe replacement story.


That’s a really good “how to”! My problem with plumbing is NOT doing the solder… it’s just like soldering brass instruments, afterall… it’s crawling under the house to turn off the main water turn off. 😀 I’m a giant spider wuss.
LOL. I kill all the spiders around here. Glad you thought the article was good… we’ve got a few more plumbing articles in the hopper (inc. how to replace an electric water heat 🙂 )
One additional tool I’d suggest is an inspection mirror. I’ve found it invaluable for checking you’ve soldered the backside of the joint that you can’t see.
Gene, good tip! Thanks for adding…
I’m dealing with a leaking shut off valve (leaking at the stem when open or closed) but its galvanized pipe – threaded.
Can’t see how the valve can be unscrewed unless the threads are opposite (one left hand, one right). Haven’t tried yet. Any ideas? Do have water turned off at street presently.
Also, if anyone would like to comment: water comes in from the main on 3/4″, there is then a 1/2″ curve (as it comes throught the basement wall), followed again by 3/4″ now going vertical. This seems like a stupid thing to do – how bad is the 1/2″ hurting my water pressure (which is poor)?
Maybe I’ll call a plumber and he can tackle both issues – the 1/2″ 90 degree, where it connects to the street main, is only about 2 inches out from thebasement wall with little room for do-overs. It also has a lot of plumbers compound (?) on the joint (could be bad news I think).
Jon,
You must have an old house – galvanized water pipes went out of style a while ago.
The 1/2″ elbow is a problem – probably constricting your water flow (already a problem with deposits in galvanized pipe in the first place). I would replace it.
As far as a galvanized repair, you’ll have to precisely cut threads at the end of pipe to do it… Here’s an article that might help if you decide to solder in copper and make the valve copper or CPVC instead.
http://www.rd.com/32499/article32499.html
Otherwise, I’m no expert on galvanized… would suggest a plumber for the repair.
I’m trying to solder a shut off valve so I can work on the bathroom without shutting off the water to the rest of the house. I live in an older home and can’t turn the water off 100%. I”ve shut off the main valve, got it down to a drip. I”ve turned off the circuit breaker to the water pump. and yet it still drips. I’ve soldered all the dry connections.
Is there any way to stop the water?
I actually tried putting some bread in the line which seemed to stop the water but not long enough for me to successuflly solder it.
any other ideas?
Phil, did you try turning off the breaker for the water pump before you turned off the valve? Seems to me like you ought to be completely cutting the flow at that point.
Excellent diy article. I want to install a 3/4 ball valve on 3/4 cu pipe. Should I disassemble the valve (socket x socket )before soldering to prevent any damage to any internal seals that may be present?
F. White, I would just leave it together but open and solder it while assembled. All the valves I’ve worked with (a small set, granted) were designed to be soldered as a unit.
I have two shut off valves in my basement, one in front of and one after my water meter. the later one is all corroded and I want to replace it. The first one looks fine, but when I turn it off it still lets water trickle though. do they make a valve that does not require sodering, because I won’t be able to keep it dry?
Water pressure in my home is half of what is normal. I have checked everything in the house. I have a whole house water filter installed where the water comes into the house and have replaced the filter. What else can I check before I have to call the plumber?