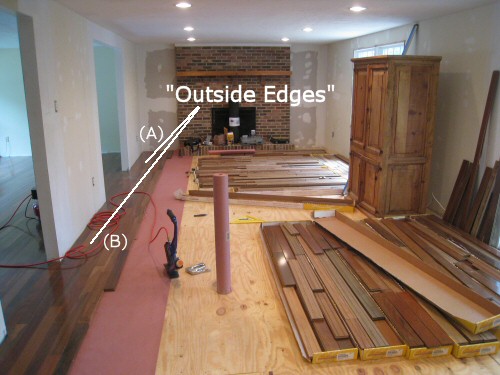
Many hardwood installations require you to transition from one room to another, sometimes around a dividing wall that has an outside edge that will require a new first board. An outside edge occurs when you install hardwoods around an object and are effectively left creating a new starting row along the outside edge of the object. Take a look at this picture from our installation for tw0 example locations:

Note that which walls display this phenomenon is a direct result of the direction you choose to lay hardwoods in the room. Since we’re laying from the front of the house to the back of the house, the load bearing wall across the center creates outside edges the whole length of the house.
We’re laying 1100 square feet of Brazilian Walnut flooring across the first floor of our home. If you’d like to follow along with these articles, please subscribe using the buttons at the right (RSS, E-mail). For an index of all the articles in the series, see this article on How to Install Wood Flooring.
The Challenge with Outside Edges
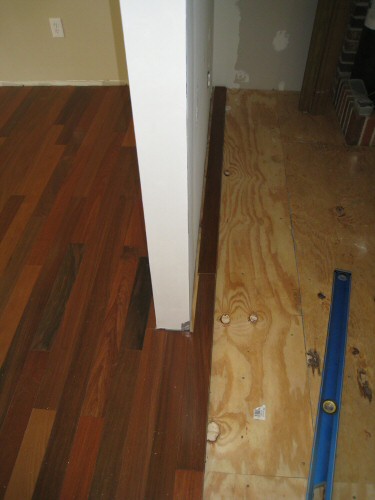
Each of the two locations above presents a set of challenges. In Location (A), the hardwoods must be gapped at least 1/2 inch from the center wall and back wall near the fireplace, but must stay perfectly straight relative to the rest of the floor. This is challenging because there is no support against the center wall when nailing, and wood is an imperfect building material. The picture below is a close-up of Location (A).

Without care, it is easy to bend the board back towards the wall, or forward towards the brick fireplace hearth, which will create gaps in subsequent rows of the installation.
In Location (B), the challenge is similar to Location (A), except that you must also ensure a clean rejoin with the existing hardwoods. In many ways this makes the job easier, especially if a single board can be used to span the entire gap. A single board is more likely to prevent the boards from being installed concave or convex relative to the rest of the floor.
How to Work Hardwoods Around These Walls
Working around these walls is simple. We cover all the steps in our instructions on laying the first few hardwood boards, so refer to that article for the pertinent How-To steps.
What’s important to realize is that in these situations, you are essentially laying a new first board and all the rules for laying that board apply. A highly accurate 8 foot level can be helpful in this step, since you can align the first few feet of the level with the existing floor, and allow the rest of the level to show you where exactly the boards should be laid.
Other tips that we discuss in the instructions for laying the first board include:
- Snap a chalk line guide for the first board.
- Shim the board against the wall once you have an accurate starting location.
- Use plenty of fasteners with your hardwood finish nailer to ensure the board doesn’t move as you work forward from it.


I’m installing 2-1/4″ x 3/4″ Hardwood flooring in my Kitchen. I completely gutted the Kitchen and had planned on installing the Hardwood floor under the new Kitchen cabinets. Since then I’ve heard both stories; ” do not install under the cabinets but it’s ok under the refrigerator and dishwasher”. OR “Yes its OK as the cabinets are screwed to the wall and not the floor”.
I figured that if the new floor goes completely under everything i don’t have to worry about fitting my dishwasher under the counter top if. It would seem to be easier doing the entire floor.
What do you suggest? Thanks. Jack
I’m sorry that I didn’t answer this at the time and I’m sure your project is over, but for the benefit of other readers, the answer is that you should run the hardwoods underneath the cabinets, appliances, etc. One challenge with prefinished woods, however, is that because the floor is not a single contiguous, sealed floor, you have to worry about water issues, including water seaping between the boards and creating problems with the boards cupping. You will need to be very careful to keep the floor dry, and the reality is that even with care, you’ll probably end up with some sort of problem over time.
Great article. Floor looks great, too. But when discussing working around obstacles, I am more curious about how you wrapped around the staircase in which you had two separate runs going for 8-10′ and you were then able to tie the two runs together on the other side. How did you make adjustments to the rows if they veered out of line? How did you ensure the two separate runs would be exactly even with each other when it was time to tie them back together in the kitchen? I’m beginning my floors now and this is what concerns me the most.
Thanks.
Good question, Mike. The answer is that we laid the boards real straight, kept everything tight working to the other side, and they ended up lining up near perfectly. In fact, if their was an imperfection we weren’t able to detect it. If you’re using good quality wood, the wood you be very dimensionally the same and you shouldn’t have a problem just working up both sides and rejoining them.
Great article. I plan on laying cork flooring for both the kitchen and dinning room that sides next to a round stairwell base. I have a floating laminate floor right now that I will be pulling up and installing the cork flooring. What’s the best method for getting this flooring as close to the round stairwell base (approx. 10″ dia.) so I can install some some of molding that will fit next to the base and flooring? What’s the best tool for making this circular cut? Thanks for any info you can provide.
MrB. – I think the best way to get it close is to take a lot of measurements and use a jig saw for your cuts. Are you able to lay the flooring under some type of molding next to the stairs or will it butt up right next to it? If it butts next to it, it could be very hard to get a clean looking cut.