
On Tuesday, I told you about our experience with In Stock Kitchens (aka: Closeout Cabinets, Interstock Premium Cabinetry, IPC). The claim to fame of this Chinese cabinet manufacturer is solid wood cabinets at “half the price” of custom cabinetry.
In very brief summary, we were impressed with the quality and look of the cabinets, but disappointed with the customer service. Read the review at the link above for more information. You can also follow this link for IPC’s main e-commerce site.
As promised in the first article, this article follows-up with some detailed pictures of the assembly of one of the cabinets to give you an idea of what to expect out of the box with “ready to assemble” cabinets from IPC.
If you’re anything like me, I’m sure you’re at least a little skeptical of the quality of the cabinets IPC sells. The price is much better than most of the retail competition out there. While not quite half of the price of the competitors we shopped, IPC was still about 40% lower than the other quotes we received for comparable solid wood cabinets.
Our cabinets ended up costing $6,200. Two quotes from the competition came in at $9,500 and $10,500. In all cases we were responsible for the installation ourselves; however, in the case of IPC, we also had to assemble the cabinets, which took about 10 hours for two of us to complete 17 cabinets.
The rest of this article walks through the assembly of IPC’s Society Hill 15 inch base cabinet with an optional trash can assembly. The whole assembly took about 45 minutes with us stopping every now and then for pictures. Check out the video at the bottom of the article to see the soft close drawers in action!
Building Solid Wood Cabinets from IPC
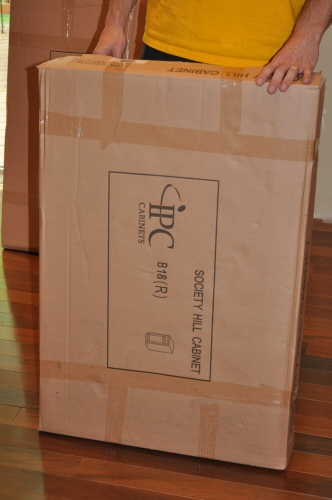
This particular cabinet is going to house a double roll out trash can kit that is sold separately. You can see that the cabinet itself ships in a pretty flat box. This is typical of IPC cabinets. The boxes are all a little larger than the side or face of the enclosed cabinet, whichever is bigger.
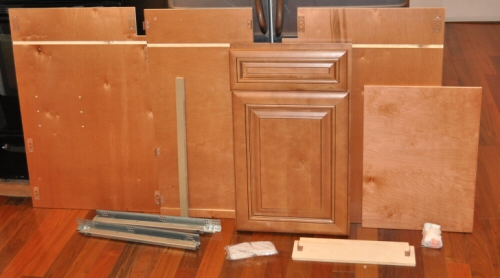
Inside the box are all the components for the cabinet, but somewhat surprisingly, no instructions! Fortunately, these cabinets are “designed for assembly” which essentially means there’s pretty easy to figure out, even without instructions. Notice that the door is pre-mounted on European hinges to the face of the cabinet. The drawer front is actually not pre-mounted, its just sitting on top of the door in this picture.
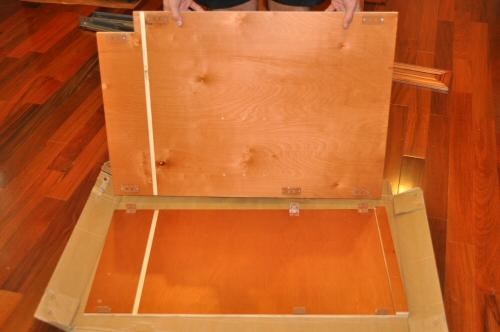
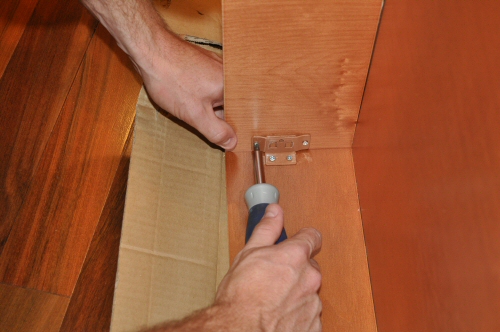
To get started, you lay the back of the cabinet flat and attach the first side. You can see that there are three pre-mounted L-brackets on these two components that align. We were impressed that on all 17 cabinets we assembled, the L-brackets perfectly lined up on all components. That is a testimony to how refined the manufacture process is on these cabinets.
The second side goes on exactly the same way. After this, the routed channel on the left, back, and sides of the cabinet line up. This channel will house the bottom shelf of the cabinet.
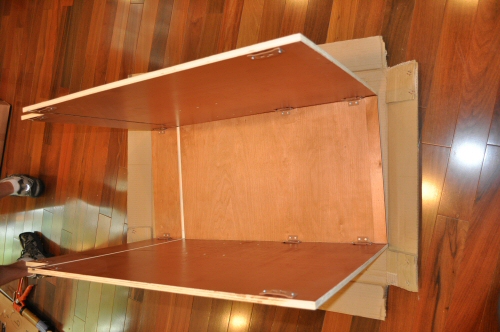
At this point, you apply construction adhesive around the routed edge to prepare for the bottom shelf to be inserted.
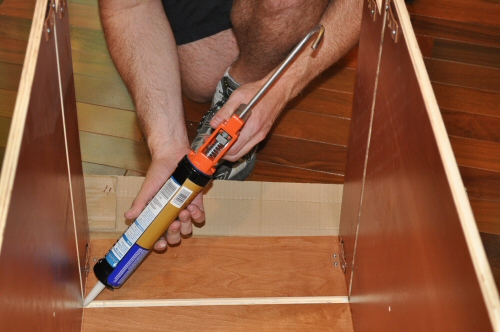
Then, insert the bottom shelf into the groove, and wipe away excess glue.
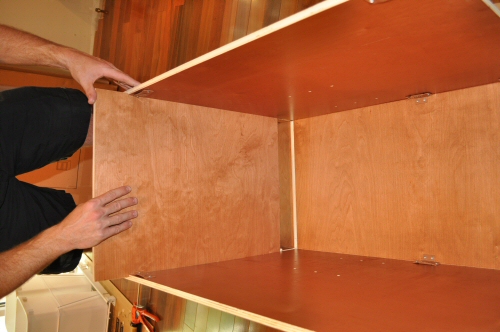
After that, tighten down all the L-bracket connectors. This involves tightening the two outer screws on each “strap” and then adding a third screw that actually goes through the bracket and the strap (not pictured, but you can see the center hole below).
At this point, you have a cabinet with two sides, a back, and a bottom lying on its back. Apply construction adhesive to the front edges of the sides and bottom, preparing to fasten the face of the cabinet in place. You can see that the face of the cabinet will also be connected using L-brackets, and is routed to accept the sides and bottom of the cabinet.
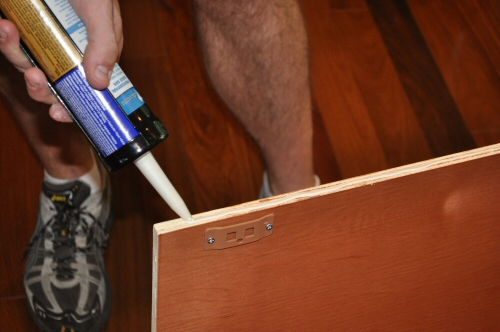
Next, lower the face of the cabinet onto the sides and bottom. The L-brackets fit neatly into the straps on the side and bottom of the cabinet, and the routed edges will cover all faces and “snap” into place. The brackets provide strength while the glue is drying.
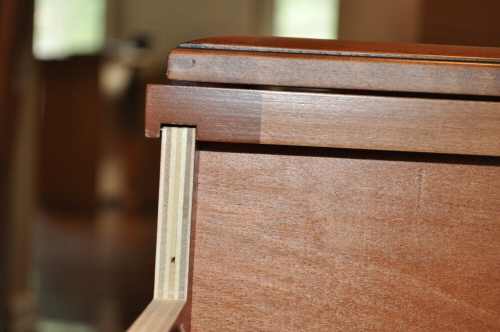
This angle from the bottom shows what the tongue-and-groove fit looks like down by the toe kick. It also shows how nicely the front frame has been joined, sanded, and finished for the cabinet face. It is very smooth.
With the cabinet face attached, the bottom of the cabinet is finished by installing the toe kick. IPC offers two options for finishing toe kicks. The first is to install only the included toe kicks on every cabinet individually, which leaves a small gap between each cabinet. This can be problematic if you need to shim some of the cabinets in front or if you just don’t like the small gap.
As an alternative, you can buy 8 foot toe kick lengths that are 1/4″ thick and run them across all the cabinets after they are installed. We have decided to install the individual toe kicks and run the 8 foot toe kick sheet in front of them for a cleaner look.
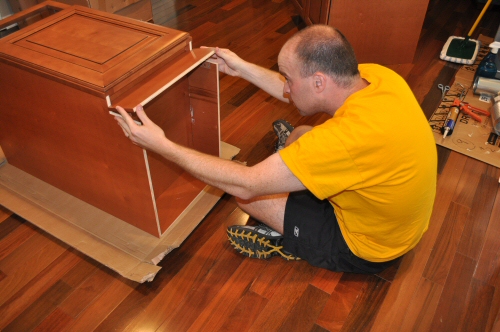
The bottom of the cabinet is now assembled, so the cabinet can be set upright.
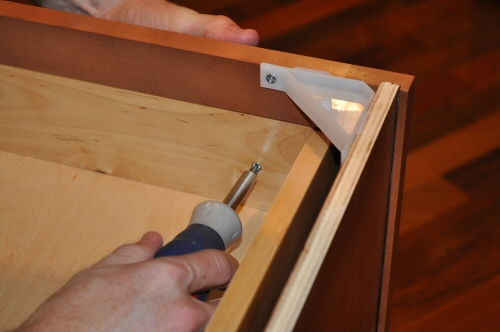
The next step is to install plastic corner braces at the top of the cabinet. These braces provide additional rigidity to the cabinet. They are absent on wall cabinets where the top of the cabinet is identical to the base, and plywood fits into routed edges of the sides, back, and front. (Recall from our review that all the wall cabinets are reversible).
After all four braces are installed, the next step is to install the under mount drawer slides. The Society Hill line of cabinets features soft close under mount slides. The first step is to connect the slide mounts to the back of the cabinet. The pilot holes are pre-marked to make it easy to line these up. Incidentally, this picture also shows the L-bracket and strap with the fifth screw installed through both.
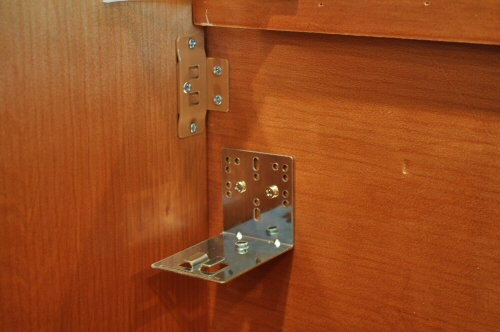
Attached to this bracket are the slide rails, which rest on the drawer opening in front and are secured to the side of the opening.
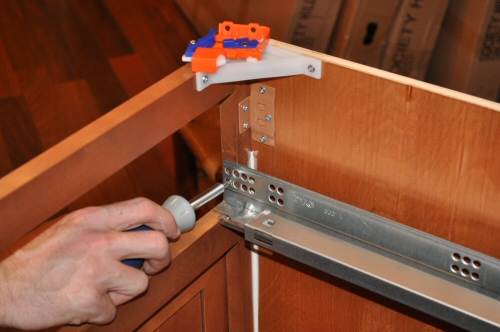
The drawer boxes ship pre-assembled. The only thing that must be installed are plastic slide catches that hold the drawer onto the slides. If there’s any component in the entire setup that feels a little “cheap”, it’s these plastic components, although they haven’t failed so far.
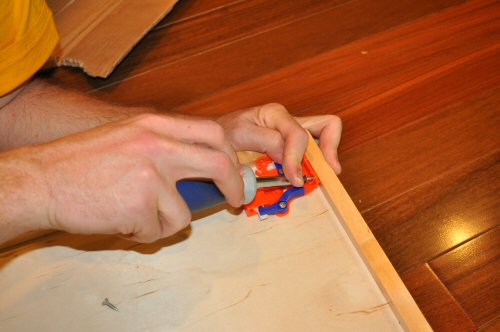
The drawer box then slips right onto the rails. The final step is to install the drawer face onto the box, which requires two screws for this size drawer. The larger drawers require four screws.
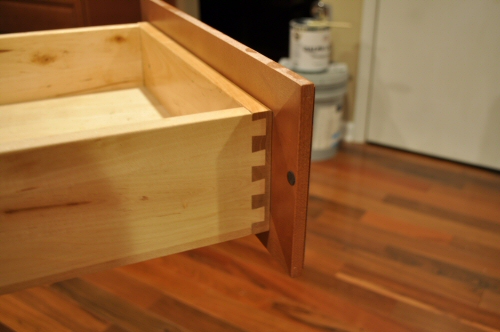
All of IPC’s cabinets feature full extension drawers, which means the back of the drawers come out all the way to the edge of the cabinets so that the entire drawer space is usable. You can also see on the picture below that the drawer boxes incorporate dovetail joints for strength.
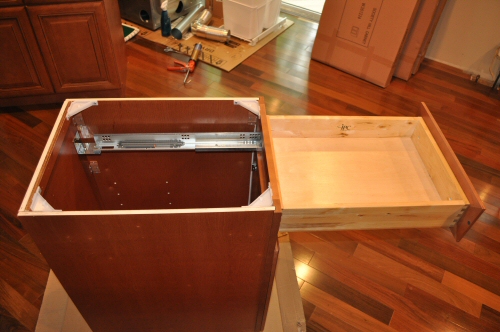
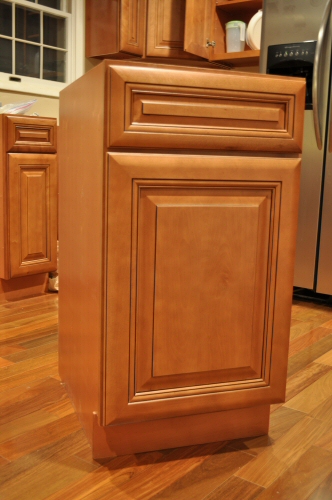
Here’s the assembled Society Hill 15 inch base cabinet.
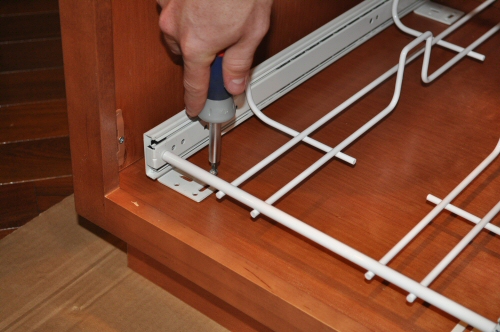
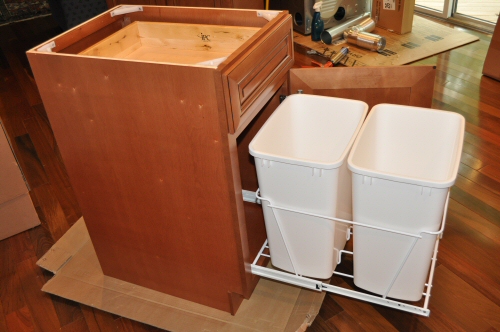
This cabinet also included an optional trash can mounting kit for the base. Installation is pretty simple, and requires mounting the base with 6 screws after the cabinet assembly is complete.
And finally, I thought it would be fun to snap a quick video to show you the hinges and the soft close drawers in action, since a picture alone can really to justice to them.
Questions & Your Review?
Feel free to pepper us with questions and comments on the cabinets. We’d also be interested in hearing your experience if you installed IPC cabinets in your own home.



Great article Fred. Couple thoughts.
1. It’s really too bad they didn’t dado the back of the side panels for the back. All of the good quality cabinets are constructed that way.
2. They really should include a wood stiffener across the back of the cabinet that goes from side to side, dado’s at the sides and a dado at the back. Again this is pretty standard on my boxes today.
3. The top cabinets should be no different than the top, not sure why they skip the stiffeners on those.
4. The materials look nice…good plywood from the looks of it.
5. It’s really amazing how well cabinet companies have got the pre-drilling down now and everything fits like a glove.
Your kitchen is going to look great!!
Todd, I appreciate the expert thoughts, although I think you’re a bit of a naysayer on these cabinets and I’d like to address a few of your points.
#1: I agree, they could have routed the back side edges on the base cabinets and still included the L-brackets which would have created a better glue surface for the back of the cabinet. I don’t think its fair to say that “All good quality cabinets are constructed that way,” though, because it implies that these aren’t good quality. The real question comes down to the strength of the joint and whether it will hold up over time. Essentially, there are 3 strong metal L brackets along the edge, the bottom plywood of the cabinet is been glued to the back and the sides of the cabinet, and there is a plastic triangular support screwed in at the top to the back and sides. Also, the front is routed, so it isn’t moving. You could optionally glue the edge of the back if you desired even more support, however, the cabinet won’t budget at all right now. When the base cabinets are fastened to the wall they will be shimmed underneath and optionally screwed (with spacers) side-to-side to one another. Right now I can’t see how the added strength of the routed edge would give you a lot more than what you’ve already got.
Note that on the wall cabinets the sides of the cabinets are indeed routed for the back, with mounting plywood at the top and bottom of the wall cabinet in addition to the plywood for the back. It is far more important for the wall cabinets to be routed this way since the back is what holds them up!
#2: They do include the wood stiffener bar (see pic #3, towards the right). The wall cabinets have stiffeners at the tops and bottoms.
#3: Not entirely sure what you mean here…
#4: The materials do look very nice. Being from China, I am always concerned about some strange manufacturing process that was used that is going to end up like the crazy chinese drywall situation… hopefully that doesn’t happen. I’ve got lots of things from China in this house and am pretty happy with them 🙂
#5: Concur.
At Home Depot, we looked at comparable Thomasville cabinets. To give you an idea, if we would have gone with the cheapest Thomasville available, we would have paid about $8000, and we would have gotten MDF construction, no soft-close drawers, etc. When you put in the upgrades to get Thomasville to all plywood construction with all the “pluses” that come standard on these, you end up at $9,500, which is $3,300 more than we paid, or the cost of all the appliances for the kitchen.
Now, to prove I’m not a complete apologist for these guys, the one place where I see Thomasville coming out ahead is in the rail slides for the drawers. These slides, while soft close and undermount, don’t feel as sturdy as those offerred by Thomasville. I’m hoping we don’t end up in a situation where they have to be replaced over the long haul.
Obviously, time will be the test of these to see if we made a right decision. I was very skeptical at first, but after buying and assembling, I think the trade is worth it and probably will be for most DIY kitchen remodels.
Fred,
I’m not trying to pick apart the cabinets. I’ve just got years of helping folks replace cabinets that haven’t stood the test of time. Ultimately it’s been my experience that cabinets take severe abuse and most of the details I point out are details that seem to make a big difference.
The price difference is impressive and most of that is due to the labor of assembling the boxes and their ability to ship them oversees for less money.
Frankly I think you got a great value and a decent product. People just need to realize that there are some subtle differences in the cabinet construction.
I’m sure the drawer slides are probably a lighter gauge knock off of Blum slides which quite a few cabinet companies are now doing to trim prices.
The other interesting thing will be how the door panels and drawer fronts hold up. In the US a vast majority of all doors and drawer fronts are manufactured by a handful of companies. They manufacture for most of the big brands so there is a long standing track record of performance.
Certainly the money saved is huge and a great way to make a kitchen remodel achievable for folks on a tight budget.
Todd, fair enough. It is good to get a well-rounded perspective on what’s available out there and what will/won’t hold up.
need instruction on attaching crown molding ,bottom molding to society hill cabinets
tks
Hi Loretta, I’m not sure we can help you there. As you probably noticed, the cabinets don’t come with instructions! Our guess is that you would install it with a finish nailer and possibly some glue, and you would cut the pieces as necessary to fit. With crown molding, this may require the user of a compound mitre saw.
Hi Fred –
Thank you very much for the review. My wife and I are remodeling our kitchen and are seriously considering InStock Kitchens.com. I have a few questions for you – I noticed you chose Brazilian Walnut for your floor (we are going with Brazilian Cherry, very similar). What are your thoughts on the Society Hill and that type of flooring? DO they match? Also, Im curious to know what color countertop you went with. I happen to like the Society Hill Color but my wife really prefers the Georgtown style (which is a deep cherry color). Did you have any problems assembling the cabinets yourself? This is another decision we have to make, I would prefer to save the money and assemble myself, however, my wife thinks we dont have enough time to do that and wants them assembled. Thanks in advance for any input you can provide.
Society Hill is a little close to Brazilian Walnut. It won’t be close to Cherry. I recommend taking your wood samples into the showroom to compare.
You can see the countertop here:
https://www.oneprojectcloser.com/dupont-zodiaq-countertop-installation-review/
No problem at all assembling the cabinets. It takes about 45 minutes each for the small cabinets and about 1 hour – 1.5 hours for big ones. Once you get moving it gets faster. Took us three days working in the evenings after work to get them built. not too bad and I think it was worth the savings.
Fred — great write up! My fiance and I are replacing our kitchen cabinets and had two quotes of $14000 (custom guy) and 10,000 (home depot after ‘rebates’). She discovered the CloseoutCabinets.com website and we’re thinking about going to one of their showrooms.
My question for you is — now that you’ve had these cabinets installed for almost a year how do you feel about them? Are they holding up? I would hate to spend that kind of $$ and end up replacing things again in a few years. Thanks!
Brad, sorry for the delay. I am still happy with the cabinets – overall no complaints. The one thing I’ve noticed is that occasionally the screws that hold in the door hinges to the frame come loose (happened on two cabinets). I tightened them and everything is fine, but they have come loose a few times. I need to find a way to tighten them up. Not sure if its my fault this happens from my installation, but its not been a super-big problem. Still very happy considering the savings.
Fred:
we love our Society Hill cabinets and just purchased the sliding drawers fro my pantry. How do we install these since as you mentioned, there are no instructions!
Thanks!
Wanting to know where I can purchase wood standing trash cabinet building instructions and what costs would be for materials.
Tom, are you talking specifically about IPC cabinet instructions, or just general cabinet instructions? The cabinets from IPC themselves do not ship with instructions, and that’s what this article was about. If you’re looking for general instructions, I think you’d do better just buying a kit.
Hi Fred,
I am currently remodeling our kitchen with the Cherry Hill line. I am fortunate enough to be close enough to the warehouse to run back and forth so I was able to get to the showroom. We got the cabinets assembled and shipped so I do not have any experience with the RTA’s. the reason I went this route and spent the extra 20 percent was that my salesperson was kind enough to show me the assembly area where I could see that glue and finish nailers were being used in addition to the brackets. Also on the corner stiffeners, people should know that the granite installers may remove them when installing the granite. The only thing that I wish was a bit different is the drawers are very tough to pull open, I think they could be easier to pull out in general, but they may loosen up over time. I looked at American Woodmark (all wood as well) for 5500.00 at home depot after discounts and I paid about 3800.00 for the cherry hill. Sorry to be so long winded, but I am installing over the holiday. Hopefully someone can use the info.
Kevin, welcome to One Project Closer. I hope you’ll stop by again soon and become a regular reader. Thanks for this addition. We’re still very happy with our cabinets, especially for the price. Have a great new year!
Hi Fred,
I’m looking at doing a kitchen remodel in the next year or two. How are these cabinets holding up?
How do the plastic glides go on the drawer, the online is not clear at all on how it goes on, pls help ?